Project: iContacts
iContacts is an address book application that helps you manage your contacts easily. The application has a GUI but most of the interactions happen using a CLI (Command Line Interface). The application was made by keeping the target audience as university students and its features help a student effectively manage their university life. You can use iContacts to add, edit and delete contacts. It can store various details about the contact which can help students in emailing, finding their location and identifying them by their display picture. It has an easy-to-use search function to find specific contacts quickly. It also provides reminders for upcoming birthdays of contacts within the application, and allows you to create your own reminders for upcoming events.
Code contributed: [Functional code] [Test code]
Adding Display picture for each person : displaypic
Adds a Display Picture to an existing person in the address book.
Format: displaypic INDEX [PATHOFIMAGE]
Examples:
-
displaypic 1 C:\Users\Admin\Desktop\Sem 3 Mods\CS2103T\mypic.jpg
Adds themypic.jpgat the given path to the person atINDEX1 as his display picture (Refer to Figure 8) -
displaypic 2
Removes the existing display picture for the person atINDEX2
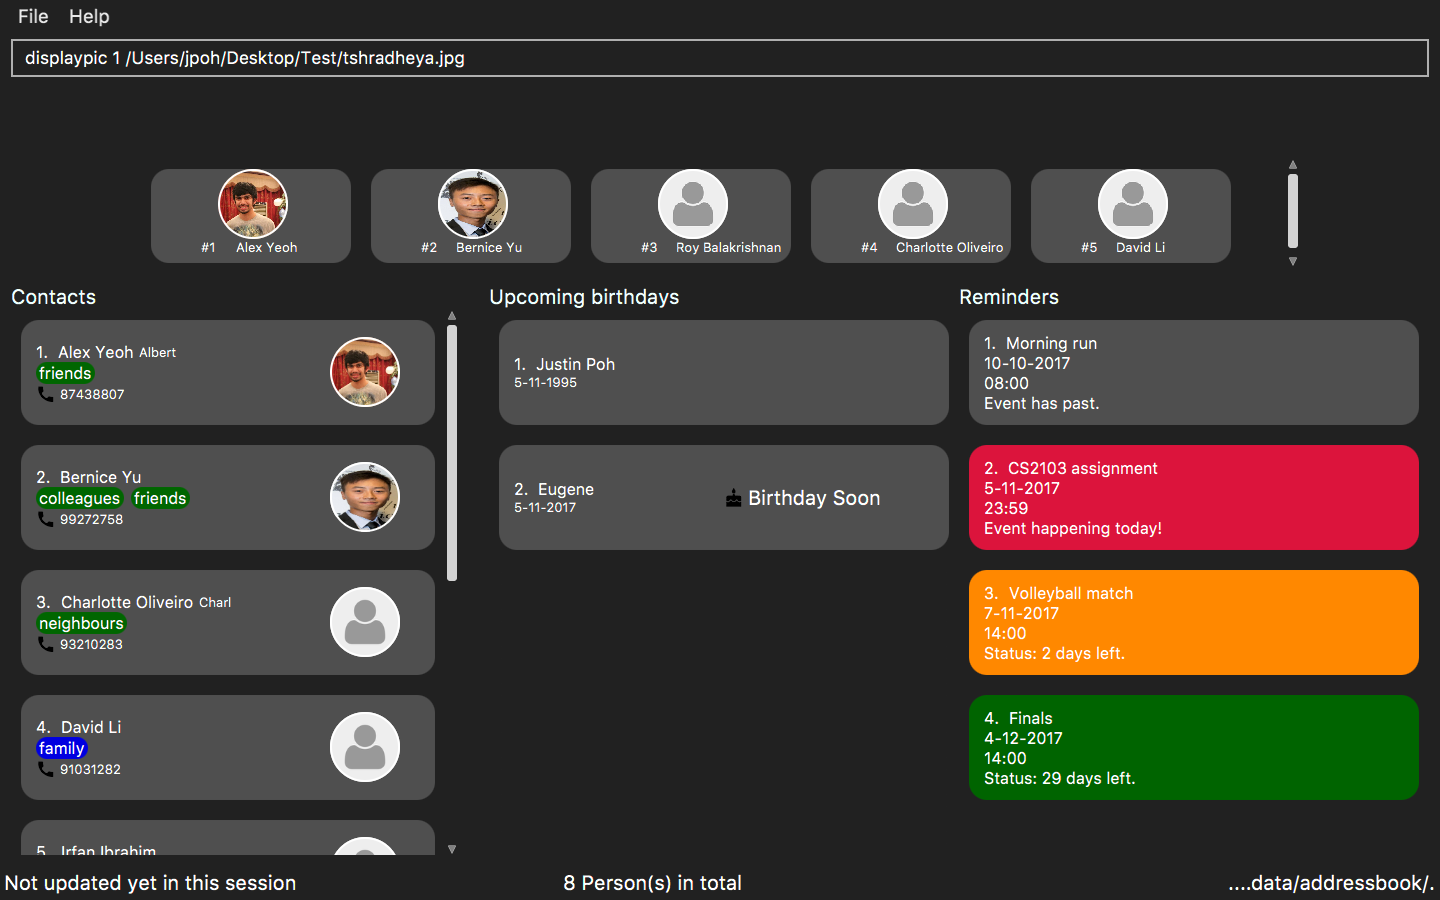
Figure 8: Adds a picture to the first person.
End of Extract
Justification
The Display picture command is used to add a personal factor to the iContacts application. By adding a personalised display picture for each contact, the user can identify their various contacts uniquely especially when you have multiple contacts having the same name. The Display picture also adds a visual appeal to the product giving a better User Interface (UI) design and making the product more appealing to the university students.
Display Picture mechanism
The displaypic command adds or updates the display picture for the contact specified. The image is then displayed as ImageView in PersonCard and DetailsPanel.
The arguments of the command are INDEX and PATHOFIMAGE. The image needs to be present in the local device of the user.
The Display Picture command is implemented in a way so that the image is read from the user specified path. It is then stored in iContacts directory so that the image is never lost.
By executing the given code below, a new folder named 'pictures/' is created if it is missing. The folder is used to store the images.
public void createPictureStorageFolder() throws IOException {
        requireNonNull(filePath);

        logger.info("Picture folder "  + filePath + " created if missing");
        File file  = new File(filePath);
        FileUtil.createIfMissing(file);
    }
Since the command has to read and write an image, the Storage architectural style is used and extended to Display pictures.
The following UML diagram shows the Storage Architecture for reading and writing of image file (Refer to Figure 19):
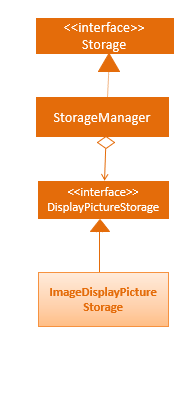
Figure 19 : UML Diagram for the extended Storage Component.
This command works by retrieving the image using BufferedImage. The command extracts the image from the specified absolute path of image e.g. C:\Users\Admin\Desktop\My files\pic.jpg
It then stores the image in the folder called /pictures/ present in the same directory as .jar by giving it a unique hashcode based on the user’s email address.
The reading and writing of images is done using the ImageIO class.
An event handler is used to notify the UI and Storage component of the changes made in image and its name.
The sequence diagram for adding a display picture is shown below (Refer to Figure 20):
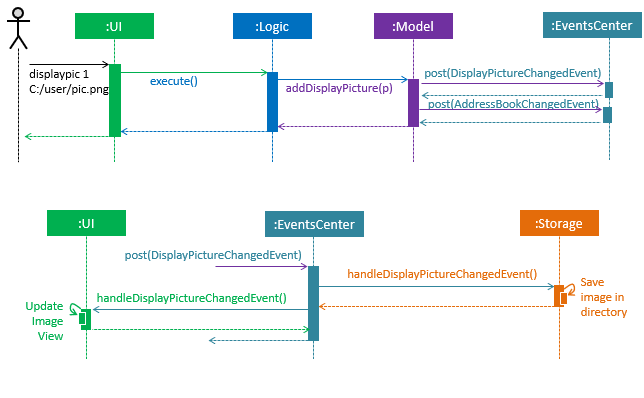
Figure 20 : Sequence Diagram for Display Picture Command.
The binder for refreshing the image every time the picture is updated is implemented by the following function:
public class PersonCard extends UiPart<Region> {
    private void assignImage(ReadOnlyPerson person) {

        Image image = new Image("file:" + "pictures/" + person.getDisplayPicture().getPath() + ".png",
                            IMAGE_WIDTH, IMAGE_HEIGHT, false, false);

        displayPicture.setFill(new ImagePattern(image));
    }
}
The Display Picture mechanism is done by using ImageView/ImagePattern in JavaFX which is a part of the UI Component.
The Circle shape is used for better UI/UX design and is filled with the ImagePattern.
The wireframe used to display the image for each person is shown below (Refer to Figure 21):
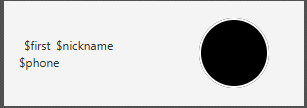
Figure 21 : Wireframe for the PersonCard.
The new image stored in directory is given a unique name which is formed using the hash code of the unique email address of each contact. The following code is used to set the name of image as the hash code:
public class DisplayPictureCommand extends Command {

    @Override
    public CommandResult execute() throws CommandException, IOException {
        /... executes function of Reading and Writing Image ...

        displayPicture.setPath(readAndStoreImage.execute(displayPicture.getPath(),
                            personToEdit.getEmail().hashCode())); // image name formed in this line
    }
}
Reason for this type of implementation
The command is implemented in this manner because of the following:
-
By specifying the index, there is no ambiguity as to who should be assigned the display picture.
-
The
PATHOFIMAGEmust be an absolute path on the local device to make sure the image is referenced. -
The image is stored in directory with a unique name to avoid conflict. The hash code of the user’s email address is used to maintain uniqueness.
-
The task is done using CLI to follow project requirements.
-
The image is stored in png format to ensure maximum compatibility.
-
In case of image corruption/deletion, care is taken to avoid hanging of UI and display the default image. This is done by checking
file.exists().
Design Considerations
Aspect: At what stage should the image be read and stored
Alternative 1 (current choice): Make proper Storage Architecture for reading and writing of Image.
Pros: It will follow the existing Architectural Design and Software Engineering Principles like OCP.
Cons: It will take more time and will be tougher to implement.
Alternative 2: Invoke 'ReadAndStoreImage' from Logic component.
Pros: : It will be easier for new developers to understand the sequence diagram and maintains event-driven nature.
Cons: It will cause bad architectural design and will not follow the pre-existing pattern and moreover will defy the Law of Demeter.
Aspect: How should the image be taken from user
Alternative 1 (current choice): User has to enter the absolute path of image by checking his local device.
Pros: It will be a complete CLI process.
Cons: It might be problematic for user to copy and paste and might result in error.
Alternative 2: Pop up a FileChooser after the command is entered.
Pros: It will be easier for users to mention the correct image quickly.
Cons: It will no longer be a complete CLI process.
End of Extract
Displaying location to a contact’s address: location
Uses Google Maps to show location of the address of the selected INDEX
Format: location INDEX
Examples:
-
location 2Returns location of the address of person atINDEX2 (Refer to Figure 9)
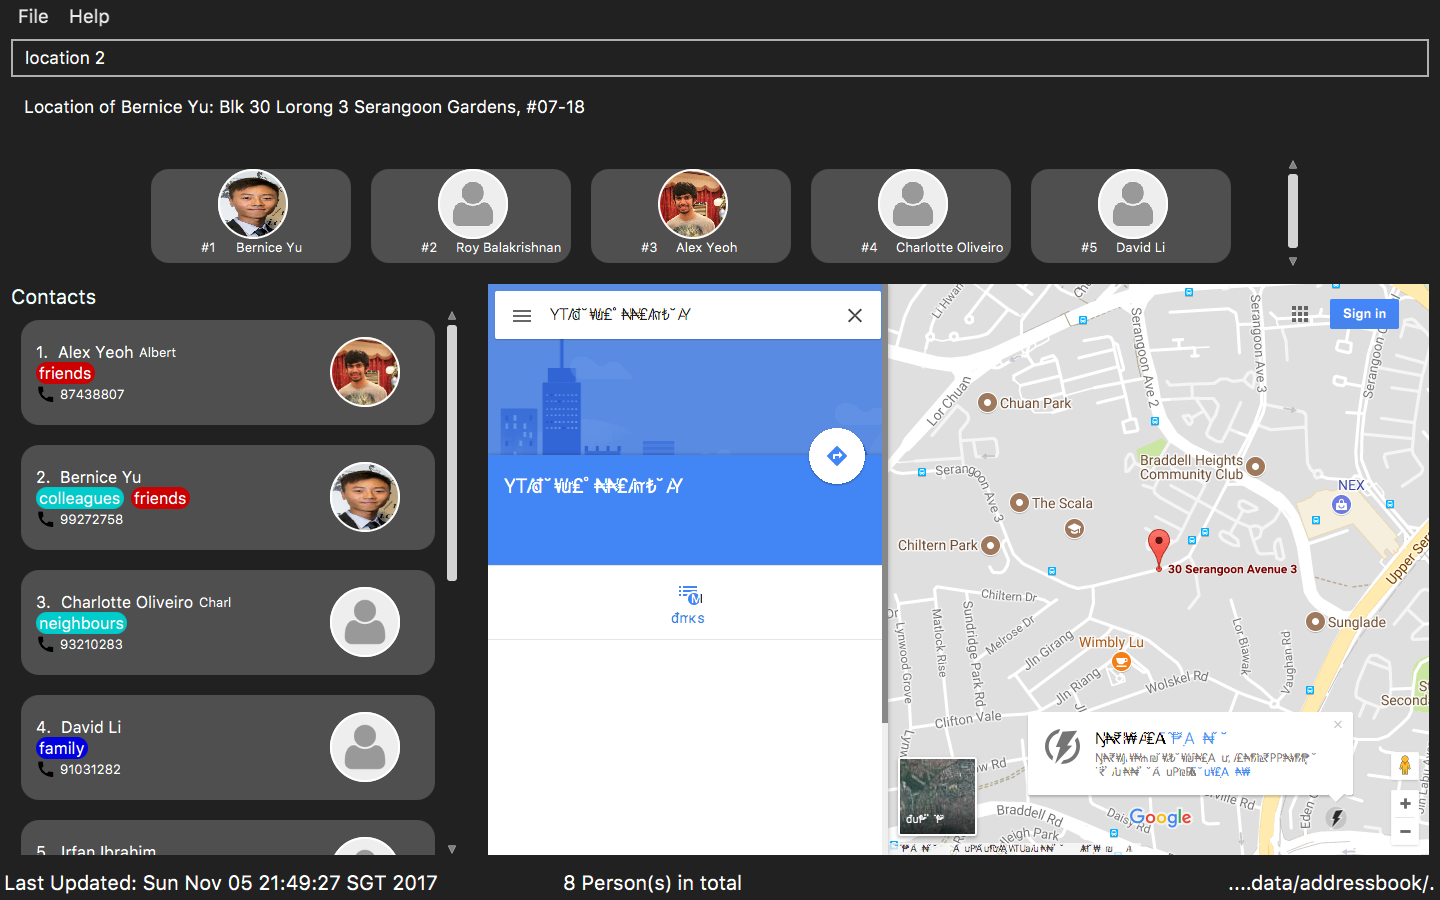
Figure 9: Displays the location of the second person.
End of Extract
Justification
Google Maps are often used by students to know the exact location of the destination. The command makes it easier for users to find exact location of a contact’s address and get directions to their place. The exact location can be obtained by just typing the command, which is a lot more user friendly than having to search for the location in Google Maps by typing the entire address.
Location mechanism
The location command is implemented in the form of an event-driven mechanism .
The diagram below (Refer to Figure 22) shows the sequence diagram for the command execution:
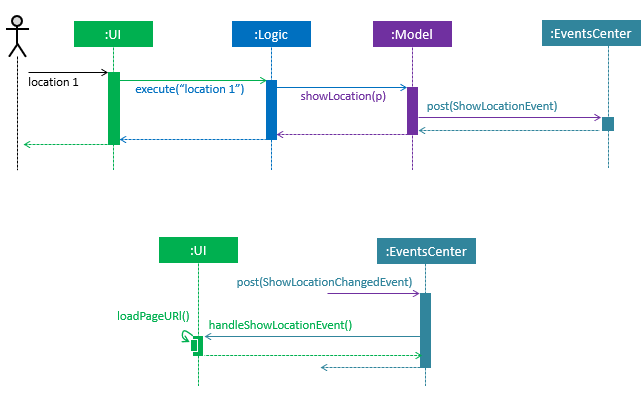
Figure 22 : Sequence diagram for the Location Command.
The execution of command raises an event ShowLocationEvent. This causes the BrowserAndReminderPanel to switch to Node Browser irrespective of the current state of the application.
The activity diagram for such case is shown below (Refer to Figure 23):
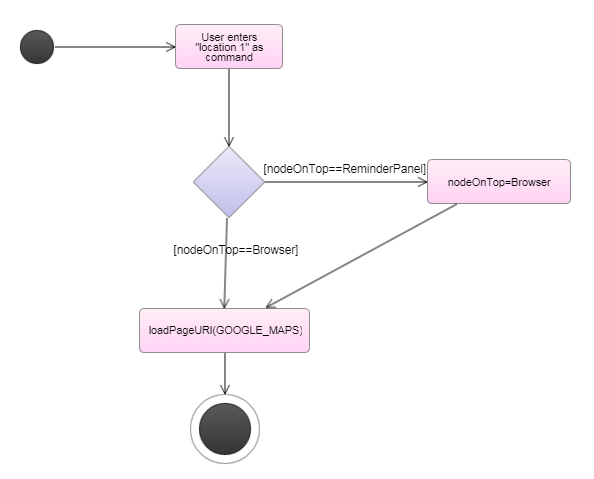
Figure 23 : Sequence diagram for the Location Command.
The following code below ensures the set up for the GUI:
private void setUpToShowLocation() {
    if (currentlyInFront == Node.REMINDERS) {
        setUpToShowBrowser();
        browser.toFront();
        currentlyInFront = Node.BROWSER;
    }
}
The URL for denoting the specified person’s address in Google Maps is set up through the following code:
public String loadPersonLocation(String address) {

        String[] splitAddressByWords = address.split("\\s");

        String keywordsOfUrl = "";

        for (String word: splitAddressByWords) {
            keywordsOfUrl += word;
            keywordsOfUrl += "+";
        }

        loadPage(GOOGLE_MAPS_URL + keywordsOfUrl);
}
Design Consideration
Aspect: What to use to show the location
Alternative 1 (current choice): Show using google maps url in BrowserPanel.
Pros: We will be able to get the location easily and accurately.
Cons: It could cause problem due to limited functionality of the URL.
Alternative 2: Use Google Maps API.
Pros: It will provide more functionality.
Cons: It could cause more resources to be used for the exact same feature and wouldn’t utilise pre-existing browser properly.
End of Extract
Emailing to a group of people having a particular tag: email
Opens up the link to send email to all people of having a particular tag. A drafter email with subject, body and recipients is opened in default browser
Format: email s/SERVICE to/KEYWORD [sub/SUBJECT] [b/BODY]
Examples:
-
email s/gmail to/cs2103 sub/Meeting body/Morning 10 am `
Allows to send email after drafting message to everyone with the tag `cs2103
in the default browser
End of Extract
Justification
Email is highly used by university students. Usually the student has to go to the mailing website, individually type in the email id of all those people whom the user wants to email.
This has been made easier through the email command. A user can simply email all contacts with a particular tag for e.g. cs2103teammates and get the drafted email with Subject, Body and all Recipients in the default browser.
This saves the user from all the typing and copy pasting of email id’s from various places just to draft a simple email.
Email mechanism
The email command has various fields to denote the Recipients (Tag), Subject, Body and Service.
The email command allows the users to compose an email in the default browser with data such as recipients, subject and body.
The relation between them is shown in the UML diagram below (Refer to Figure 24):
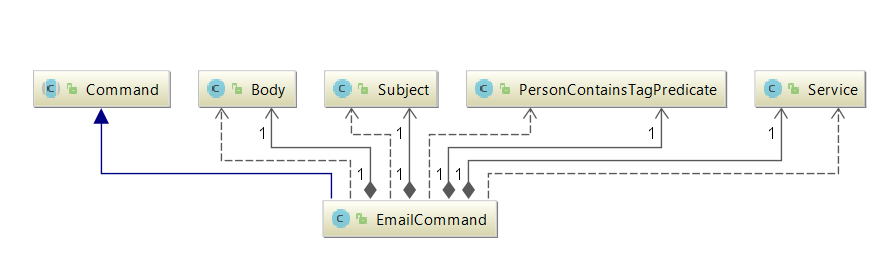
Figure 24 : UML Class Diagram for the Email Feature.
The command is parsed to get the Service, Tag, Subject and Body fields.
The parsing takes place in the following manner (Refer to Figure 25):
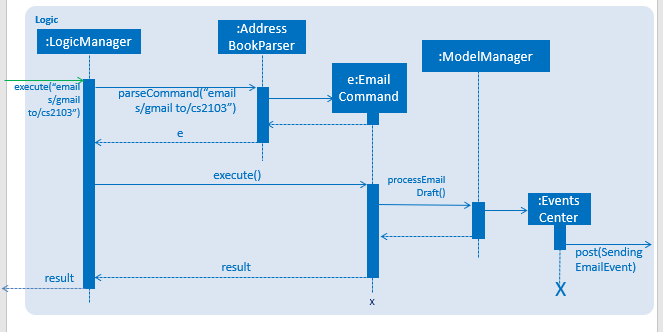
Figure 25 : Sequence diagram for parsing the Email Command.
The recipients are all contacts belonging to a particular tag.
The only two services offered are gmail and outlook as our target users are students.
|
The email command happens through an event driven mechanism. The below diagram (Refer to Figure 26) shows sequence diagram for it.
The execution of command raises an event SendingEmailEvent.
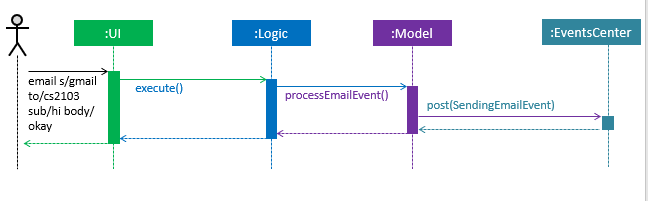
Figure 26 : Sequence diagram for the Email Command.
The URL for composing the mail is set up through the following code:
public static final String GMAIL_EMAIL_URL =
            "https://mail.google.com/mail/?view=cm&fs=1&tf=1&source=mailto&to=%1$s&su=%2$s&body=%3$s";

public static final String OUTLOOK_EMAIL_URL =
            "https://outlook.office.com/?path=/mail/action/compose&to=%1$s&subject=%2$s&body=%3$s";

Desktop.getDesktop().browse(new URI(String.format(GMAIL_EMAIL_URL, recipients, subject, body)));
Design Consideration
Aspect: Where to compose the mail
Alternative 1 (current choice): Opens the default browser of Desktop.
Pros: The default browser will have the user logged in to his email account.
Cons: High dependency on third party apps.
Alternative 2: Open in BrowserPanel.
Pros: No dependency on other apps.
Cons: It will not auto fill in the text due to older version of browser.
End of Extract
Frequently Viewed Contacts
Shows the user a list of top five contacts which the user has viewed the most
Examples:
If the contact Roy Balakrishnan is selected once, he will be moved to the top of the list as his popularity counter is more than the rest of the contacts.
This can be seen in the image below:
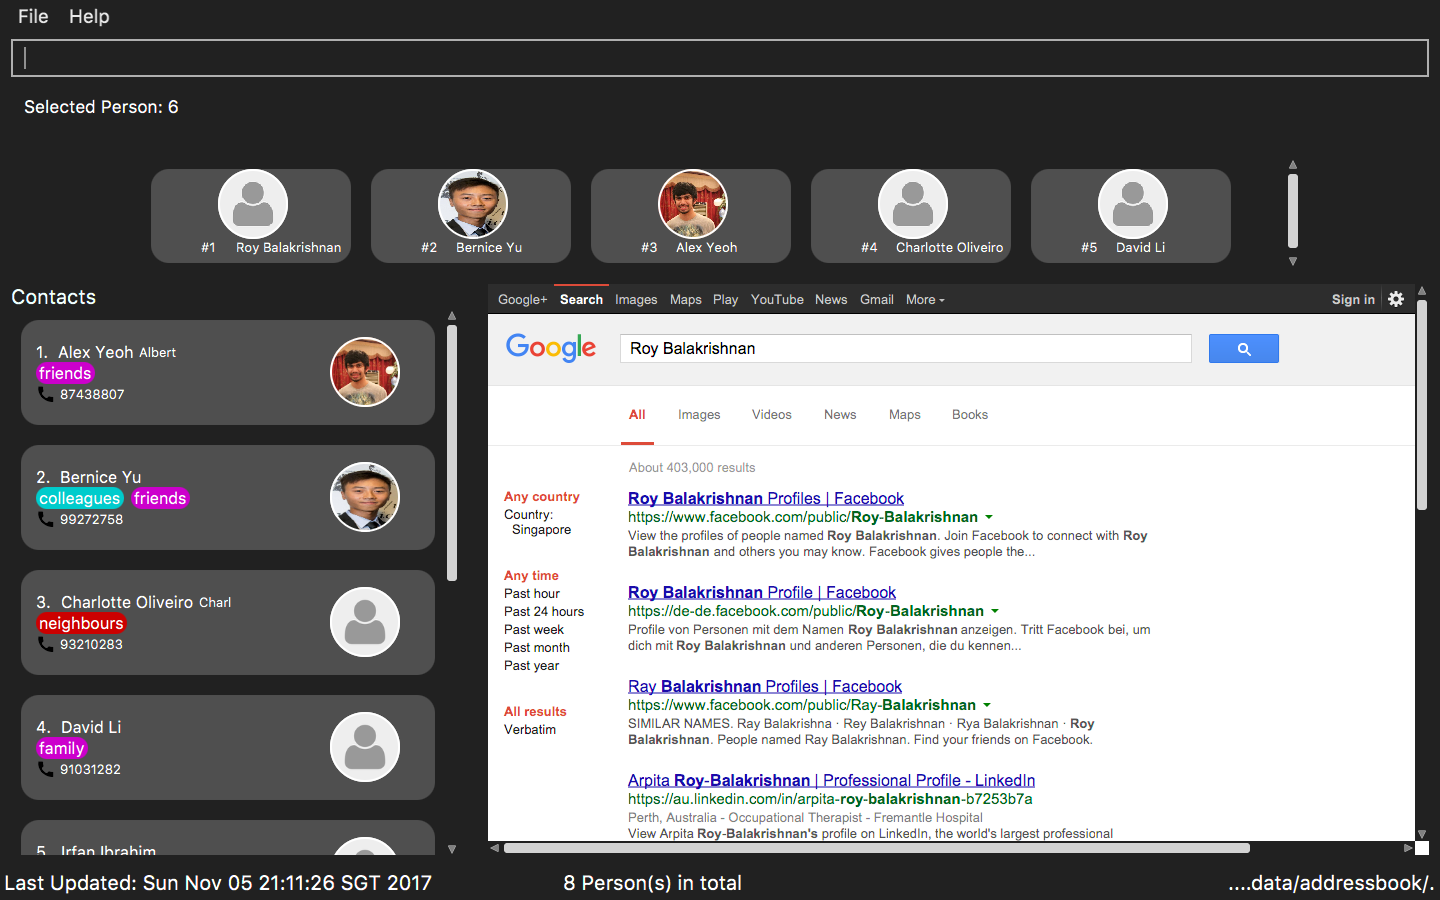
Figure 7: Roy Balakrishnan is moved to the top of the list.
End of Extract
Justification
Through the frequently viewed contacts list of top 5 popular contacts, the user can easily view their details by selecting them rather than having to type commands and search for them.
It also provides a better user experience as the user can see the people he has frequenlty visited and are his favourites on top of application.
Frequently Visited Contacts mechanism
This feature brings in a new UI element called PopularContactList, which is a list of maximum size of 5 and each element of showing the name, popularity rank and display picture in a PopularContactCard.
The way these UI elements are added is shown in the following diagram (Refer to Figure 27) :
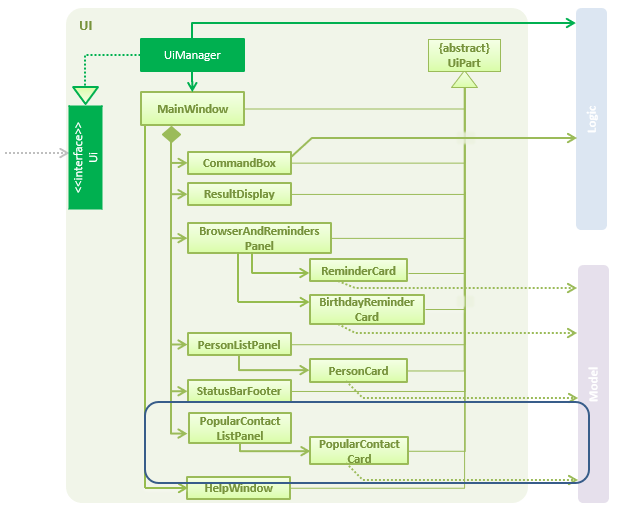
Figure 27 : Class Diagram of UI with Popular Contact Panel.
The mechanism to show the top five most frequently visited contacts is facilitated by the PopularityCounter of each contact.
For every new person added into the address book, he is assigned a popularity counter of 0. The top five popular contacts are extracted by sorting the list based on the field PopularityCounter of each person. In the case of two or more people having the same popularity counter, the person who was added earlier into iContacts is given higher priority.
This feature is not implemented as a command.The list gets refreshed whenever the PopularityCounter is supposed to change.
|
The Frequently Visited Contacts mechanism is an event-driven mechanism. However, there is no explicit command to view the top five frequently visited contacts as they are always refreshed whenever there is an change in the address book. They are always displayed on the UI below the CommandResult panel.
The event to refresh the PopularContactList, PopularContactChangedEvent is triggered whenever any of the command that increases PopularityCounter is executed.
The event triggers the following method:
public void updatePopularContactList() {
        refreshWithPopulatingAddressBook();
        listOfPersonsForPopularContacts.sort((o1, o2) ->
                o2.getPopularityCounter().getCounter() - o1.getPopularityCounter().getCounter());

        getOnlyTopFiveMaximum();
    }
The following are the commands which will increase the PopularityCounter by one for the contacts viewed or searched:
-
viewtag -
select -
details[special case when counter increases by 2 as it is a stronger indicator of who could be a frequently visited contact] -
location -
email
On execution of any of the following command, an extra event is raised which updates the PopularContactList after updating the popularity counter of the contact.
The sequence diagram for the extra event is shown below for select command (Refer to Figure 28):
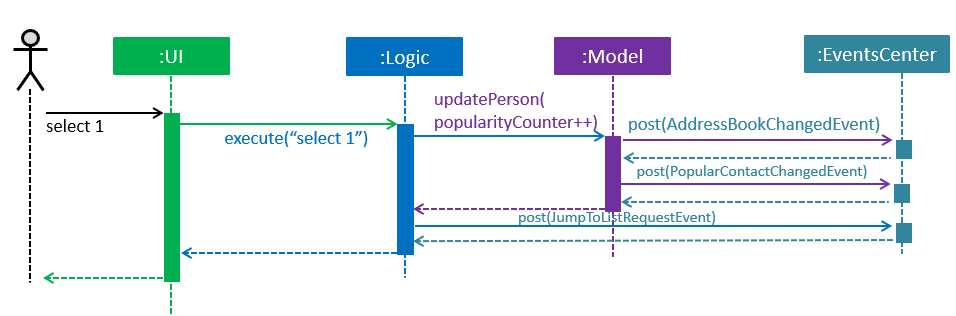
Figure 28 : Sequence diagram for frequently visited mechanism for select command.
Manual selection of person through a click also increases the popularity counter of that person. This is the same action as the details command.
|
The following method is used to increase the PopularityCounter by one:
public ReadOnlyPerson increaseCounterByOne(ReadOnlyPerson person) {
        person.getPopularityCounter().increasePopularityCounter();

        return new Person(person.getName(), person.getPhone(), person.getEmail(), person.getAddress(),
                person.getBirthday(), person.getNickname(), person.getDisplayPicture(), person.getPopularityCounter(),
                person.getTags());
    }
The sequence diagram below shows how the event is triggered and how the saving of updated address book takes place (Refer to Figure 29):
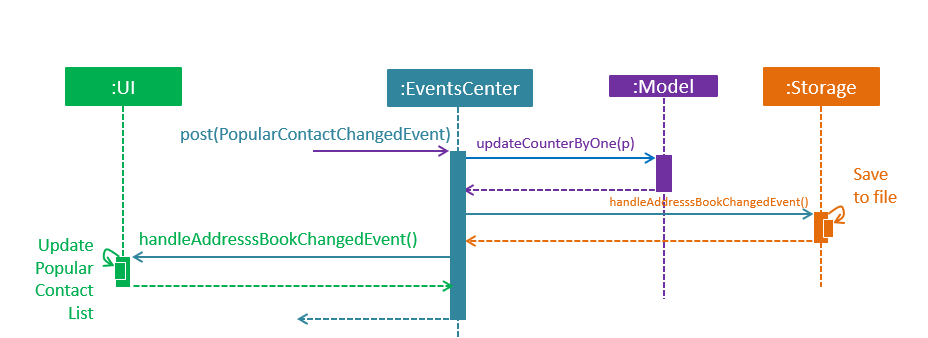
Figure 29 : Sequence diagram for frequently visited mechanism.
Design Considerations
Aspect: How to implement the feature
Alternative 1 (current choice): Refresh the list every time one of the command that changes the Popularity is executed
Pros: Becomes a dynamic feature such that user can see favourite contacts at any time
Cons: Makes application slightly slower as more execution of code for those commands
Alternative 2: Execute command to refresh list of popular contacts
Pros: Reduces regular refresh of list
Cons: Will have to keep track of command history to see the list of commands executed before previous execution of favourites command
End of Extract
Viewing details of a contact: details
Shows the full contact information of a person in the address book.
Format: details INDEX
Examples:
-
details 1
Show the full contact information of the person at index 1 (Refer to Figure 6).
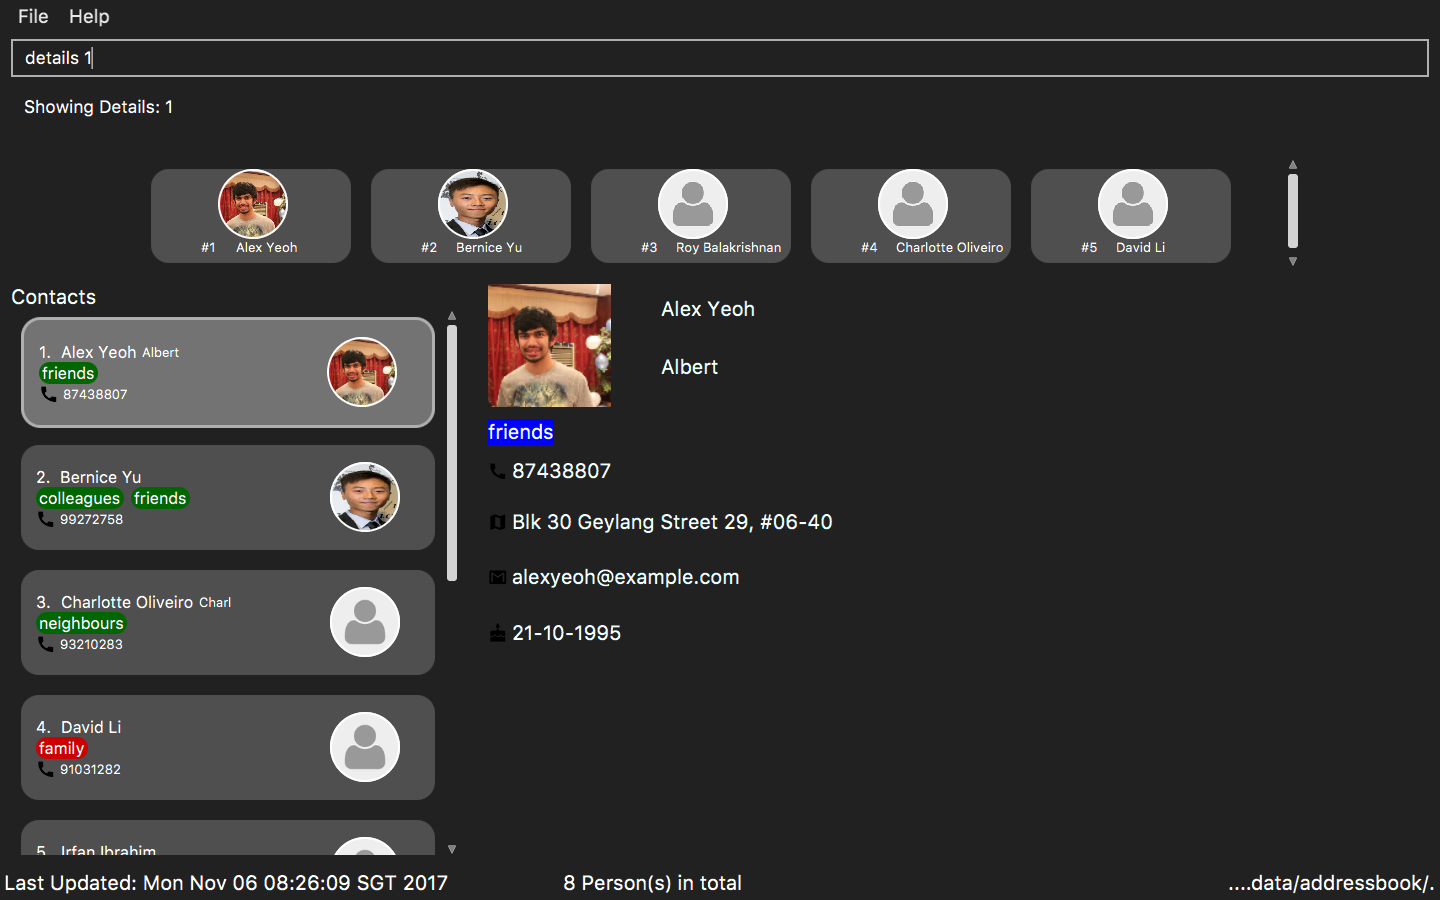
Figure 6: The full contact information of the person at index 1.
End of Extract
Justification
This command was made to improve the UI for better user experience. Now the user can only see important details in the person card and can use this command to view more details in a more enhanced UI design.
The details command also works by manual selection which gives more freedom to user when viewing details of a particular user.
Details Panel Implementation
The details command shows more details of the contact like address, birthday, email in addition to the details shown in the PersonCard of PersonListPanel
The DetailsPanel is an Anchor Pane which is embedded inside BrowserAndReminderPanel.
At any point of time, only one of the three panels (Browser, Reminder, Details) inside BrowserAndReminderPanel will have the visibility set as true and in front of the other two panels.
|
The UML diagram below represents the UI structure for the BrowserAndReminderPanel (Refer to Figure 30):
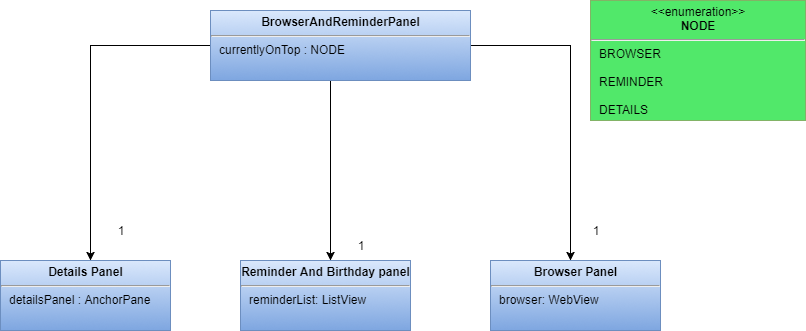
Figure 30 : UML Diagram for Panel.
The code to ensure only DetailsPanel is displayed on execution of command is shown below:
private void setUpToShowDetailsPanel() {
        detailsPanel.setVisible(true);
        remindersPanel.setVisible(false);
        browser.setVisible(false);
}
The DetailsPanel is also displayed when the user manually clicks on the PersonCard. This is made possible by raising the SelectionChangedEvent to show the DetailsPanel.
The selectionModel() of PersonListView is now linked to the details command rather than the select command.
The select command now only scrolls to the INDEX specified whereas details command scrolls to and selects the person to show his/her details in the panel.
|
The figure below (Refer to figure 31) is the wireframe for the DetailsPanel:
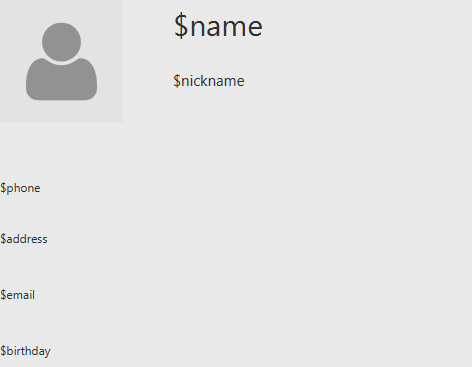
Figure 31 : Wireframe for Details Panel.
Using the FontAwesomeFx library, an icon is set for each label to make the UI look appealing as seen in the UI above (Refer to figure TBD).
The solution to show the same colour for a tag in DetailsPanel and PersonCard was resolved by having a Singleton Class TagColor.
The following code inside the class ensured that the class acts as an global class and since only one instance is created, it made the tag color’s constant.
public static TagColor getInstance() {
        if (tagColor == null) {
            tagColor = new TagColor();
        }
        return tagColor;
    }
Design Consideration
Aspect: How to improve UI
Alternative 1 (current choice): Show the extra details of contact after they are selected.
Pros: Allows more contacts to be shown in the list as the information is reduced.
Cons: User needs to manually select the user to see more details of that person.
Alternative 2: Show all detail of person in the PersonCard.
Pros: Reduces effort of selection of contact to see extra details.
Cons: Looks very cluttered and has poor User Interface design.
End of Extract
Finding all people associated with a particular Tag: viewtag
Finds all people who have the tag given in the keyword.
Format: viewtag KEYWORD
Examples:
-
viewtag cs2103
Returns all people who have the tagcs2103associated with them -
viewtag friends
ReturnsAlexandBernice1 as they are having the tag `friends(Refer to Figure 10)
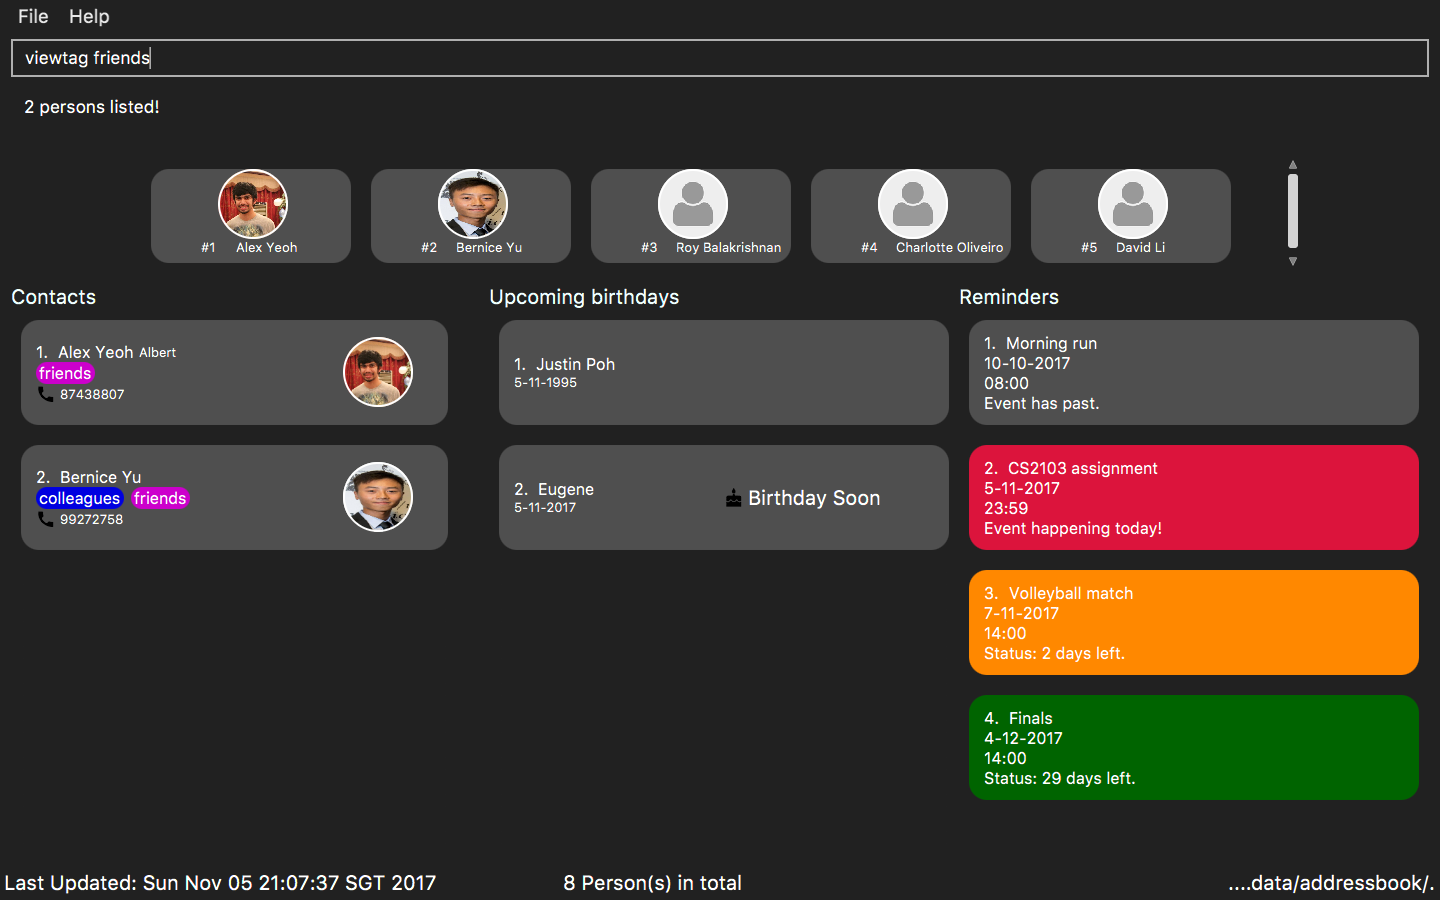
Figure 10: Listing all contacts with the tag friends.
End of Extract
Justification
Tags can be considered as groups by user. This feature is mainly implemented to enhance usage of other commands.
For e.g. in export command to export all contacts having a particular tag, user will have to use viewtag cs2103team and then use range as all for the export command than having to type the index of each of them.
It only supports one keyword as filter command was made as an stronger search command combining functionality of find and viewtag.
View tag mechanism
The command is added into the Logic component according to following class diagram (Refer to Figure 32):
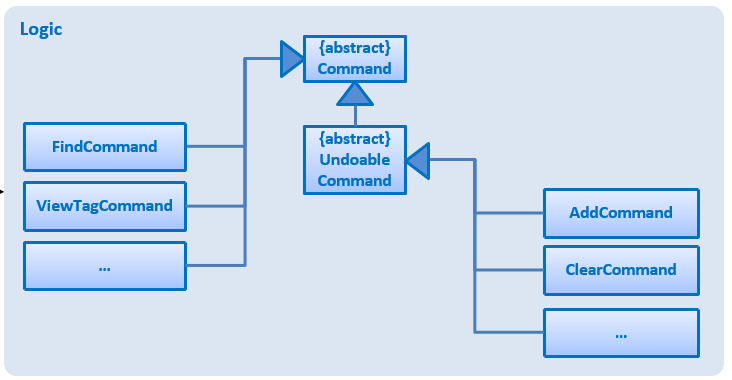
Figure 32 : Class Diagram of Logic.
The viewtag command works by setting the predicate to the Observable filteredlist.
Only one keyword is allowed for the command and it shows all people with the given tag.
The method test(ReadOnlyPerson person) iterates through the tagKeywords to find a match of every person from the address book.
Streams and lambda (Java 8 features) are used to make the code more readable as shown below:
public boolean test(ReadOnlyPerson person) {
        Set<Tag> tagsOfPerson = person.getTags();

        return tagsOfPerson.stream()
                .anyMatch(tagMatches -> tagMatches.getTagName().equalsIgnoreCase(keyword));

    }
Design Consideration
Aspect: How to filter the list
Alternative 1 (current choice): Use of Lambda and Stream.
Pros: The code is more readable.
Cons: It sometimes takes more time to process than normal loops.
Alternative 2: Loops and Conditions.
Pros: It is known to be faster than Streams at times.
Cons: It is harder to avoid arrow-headed violation of coding style.
End of Extract
Enhancement Proposed: Saving Data on Server
External Behaviour
This feature will make sure the data of contacts and reminders is stored in the servers online. The data files and images are stored in the cloud and cannot be directly changed by opening them on your device.
This will be automatically done once the user registers in the application. The files are encrypted using the SHA algorithm to prevent it from being read by others. This ensures that your data is secure and there is no privacy law violation.
Justification
This feature will make the product more personalised as the user will have to register to use this application.
Moreover, the user can now access his data from any device as it is stored on cloud storage. The data cannot be directly manipulated since it is in clound and hence the application won’t crash as data will never be corrupted.
Implementation
A login feature will be first implemented to identify user’s uniquely.
Through the following use case diagram, signing up of user will allow data to be stored on cloud which can downloaded anytime for backup purposes.
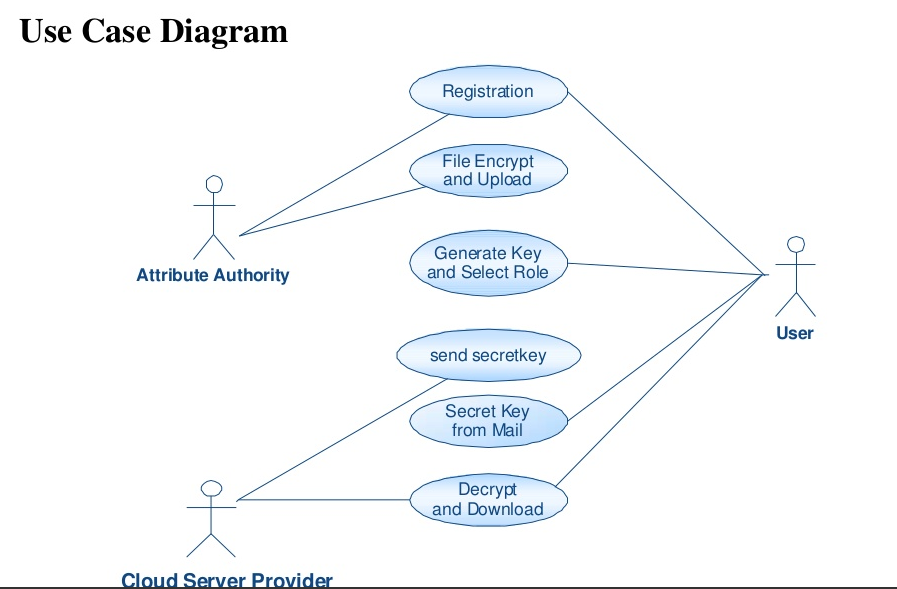
Figure 1 : Use case Diagram.
Other contributions
-
Managed all Issues and Milestone by managing the project and assigning work.
-
Wrote additional tests to increase coverage to 91%
-
Took the role of Team Leader to make important decisions regarding development of product.
-
Managed GitHub effectively to keep track of issues, merging Pull requests by resolving conflicts and keeping track of deadlines so that the weekly releases are made on time with a working product.
-
Fixed various(5+) bugs in the product including some bugs which existed previously in the product
Pull Request #231Pull Request #216. -
Added several Use Cases for features in Developed Guide
Pull Request #57. -
Improved User Interface design by adding Details Panel
Pull Request #197. -
Added Frequently Visited Contact List
Pull Request #167. -
Implemented Email Feature
Pull Request #140. -
Helped teammate fix bugs in his feature
Pull Request #236. -
Contributed in User Guide and Developer Guide to enhance its language
Pull Request #239. -
Helped several people on the forum with their technical difficulties.
-
Found 6 bugs during acceptance testing
Issues Created -
Managed all final submissions for CS2103T and CS2101
Project: NUSEvents Android Application
Students coming into university want to experience an enriching and diverse campus life. One of the most integral parts of a campus life is the host of events taking place around the campus. We want to bring forth an application, called NUSEvents by means of which members of the NUS family will be able to view the various events going around the campus on a day to day basis. Now there will be no need to worry about searching websites, scrolling through emails and pages on Facebook to know what events are being organized by various faculties and clubs. This will be convenient for all students and members of the various faculties as it will enable them to indicate their interest in the events that they want to attend.
Students will get easy access to the list of activities that will take place, thus making sure that they are notified of all important events which otherwise could have gone unnoticed. For a university like NUS, which is rated to have the best campus life, NUSEvents application will bring to you all that you need to know about the various happenings in NUS and improve the campus life experience of students. Hence it will ensure an enjoyable and fulfilling campus life for the members of the NUS family.