By: Team W14-B1 Since: Jun 2016 Licence: MIT
- 1. Introduction
- 2. Setting up
- 3. Design
- 4. Implementation
- 4.1. Filter mechanism
- 4.2. Export mechanism
- 4.3. Import mechanism
- 4.4. Find mechanism
- 4.5. Sorting mechanism
- 4.6. Undo/Redo mechanism
- 4.7. Display Picture mechanism
- 4.8. Location mechanism
- 4.9. Email mechanism
- 4.10. Frequently Visited Contacts mechanism
- 4.11. Details Panel Implementation
- 4.12. View tag mechanism
- 4.13. Toggling mechanism
- 4.14. Reminder Implementation
- 4.15. Theme-changing mechanism
- 4.16. Logging
- 4.17. Configuration
- 5. Documentation
- 6. Testing
- 7. Dev Ops
- Appendix A: Suggested Programming Tasks to Get Started
- Appendix B: Target Users
- Appendix C: User Stories
- Appendix D: Use Cases
- Appendix E: Non Functional Requirements
- Appendix F: Glossary
1. Introduction
iContacts is an address book application whose target audience is university students. iContacts aim to help students manage their contacts effectively and efficiently, as well as providing many other features such as setting reminders, tagging of contacts, emailing and more. This guide provides information for those who wish to join our team as either a developer or tester, and is intended to help you quickly understand the internal design of the application so that you will be able to understand how this application work. The guide also explains in detail the implementation of noteworthy features, as well as the testing methods used in developing iContacts.
2. Setting up
This section will guide you on how to set up the development environment for coding.
2.2. Setting up the project in your computer
-
Fork this repo, and clone the fork to your computer.
-
Open IntelliJ (if you are not in the welcome screen, click
File>Close Projectto close the existing project dialog first). -
Set up the correct JDK version for Gradle.
-
Click
Configure>Project Defaults>Project Structure. -
Click
New…and find the directory of the JDK.
-
-
Click
Import Project. -
Locate the
build.gradlefile and select it. ClickOK. -
Click
Open as Project. -
Click
OKto accept the default settings. -
Open a console and run the command
gradlew processResources(Mac/Linux:./gradlew processResources). It should finish with theBUILD SUCCESSFULmessage.
This will generate all the resources required by the application and tests.
2.3. Verifying the setup
-
Run the
seedu.address.MainAppand try a few commands. -
Run the tests to ensure they all pass.
2.4. Configurations to do before writing code
The following configurations need to be done before a developer starts writing the code. This is done to ensure that the java coding styles and practices are followed.
2.4.1. Configuring the coding style
This project follows oss-generic coding standards. IntelliJ’s default style is mostly compliant with ours but it uses a different import order from ours. Here are the steps to rectify the order:
-
Go to
File>Settings…(Windows/Linux), orIntelliJ IDEA>Preferences…(macOS) -
Select
Editor>Code Style>Java -
Click on the
Importstab to set the order:-
For
Class count to use import with '*'andNames count to use static import with '*': Set to999to prevent IntelliJ from contracting the import statements. -
For
Import Layout: The order isimport static all other imports,import java.*,import javax.*,import org.*,import com.*,import all other imports. Add a<blank line>between eachimport.
-
Optionally, you can follow the UsingCheckstyle.adoc document to configure Intellij to check style-compliance as you write code.
2.4.2. Updating documentation to match your fork
After forking the repo, the links in the documentation will still point to the se-edu/addressbook-level4 repo. If you plan to develop this as a separate product (i.e. instead of contributing to the se-edu/addressbook-level4) , you should replace the URL in the variable repoURL in DeveloperGuide.adoc and UserGuide.adoc with the URL of your fork.
2.4.3. Setting up CI
Set up Travis to perform Continuous Integration (CI) for your fork. See UsingTravis.adoc to learn how to set it up.
Optionally, you can set up AppVeyor as a second CI (see UsingAppVeyor.adoc).
| Having both Travis and AppVeyor ensures your App works on both Unix-based platforms and Windows-based platforms (Travis is Unix-based and AppVeyor is Windows-based) |
2.4.4. Getting started with coding
When you are ready to start coding, get some sense of the overall design by reading the Architecture section below:
3. Design
This section will explain the design aspects of iContacts.
3.1. Architecture
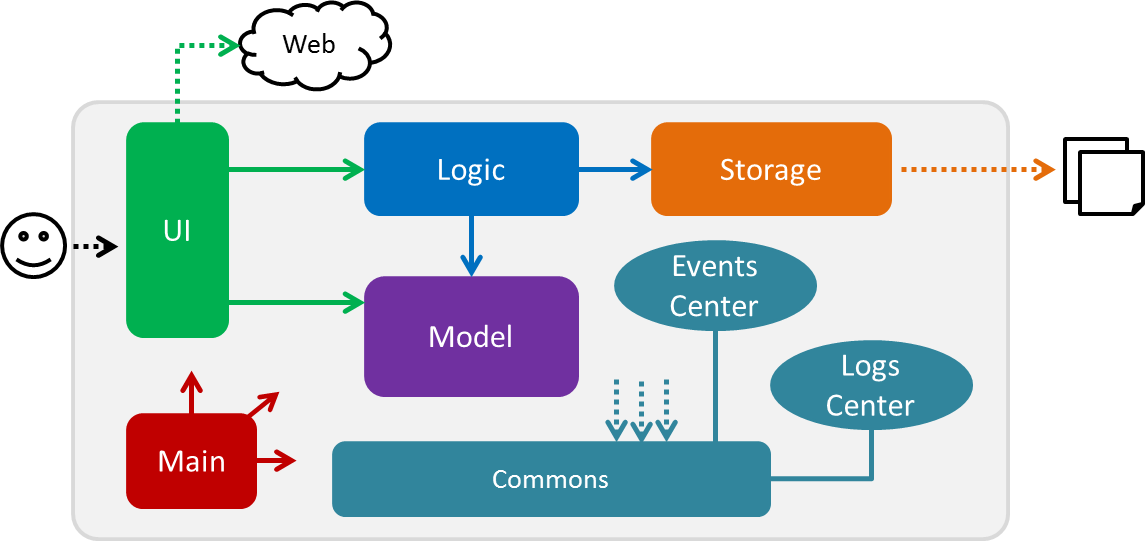
Figure 1 : Architecture Diagram
The Architecture Diagram given above (Refer to Figure 1) explains the high-level design of iContacts.
The .pptx files used to create diagrams in this document can be found in the diagrams folder. To update a diagram, modify the diagram in the pptx file, select the objects of the diagram, and choose Save as picture.
|
Below is a quick overview of each component:
-
Mainhas only one class calledMainApp, and it does the following:-
At app launch: Initializes the components in the correct sequence, and connects them up with each other.
-
At shut down: Shuts down the components and invokes cleanup method where necessary.
-
-
Commonsrepresents a collection of classes used by multiple other components. Two of those classes play important roles at the architecture level:-
EventsCenter: This class (written using Google’s Event Bus library) is used by the components to communicate with other components using events (i.e. a form of Event Driven design). -
LogsCenter: This class is used by many classes to write log messages to iContacts' log file.
-
-
The rest of iContacts consists of four components:
Each of the four components
-
defines its API in an
interfacewith the same name as the Component. -
exposes its functionality using a
{Component Name}Managerclass.
For example, the Logic component (Refer to Figure 2) defines its API in the Logic.java interface and exposes its functionality using the LogicManager.java class.
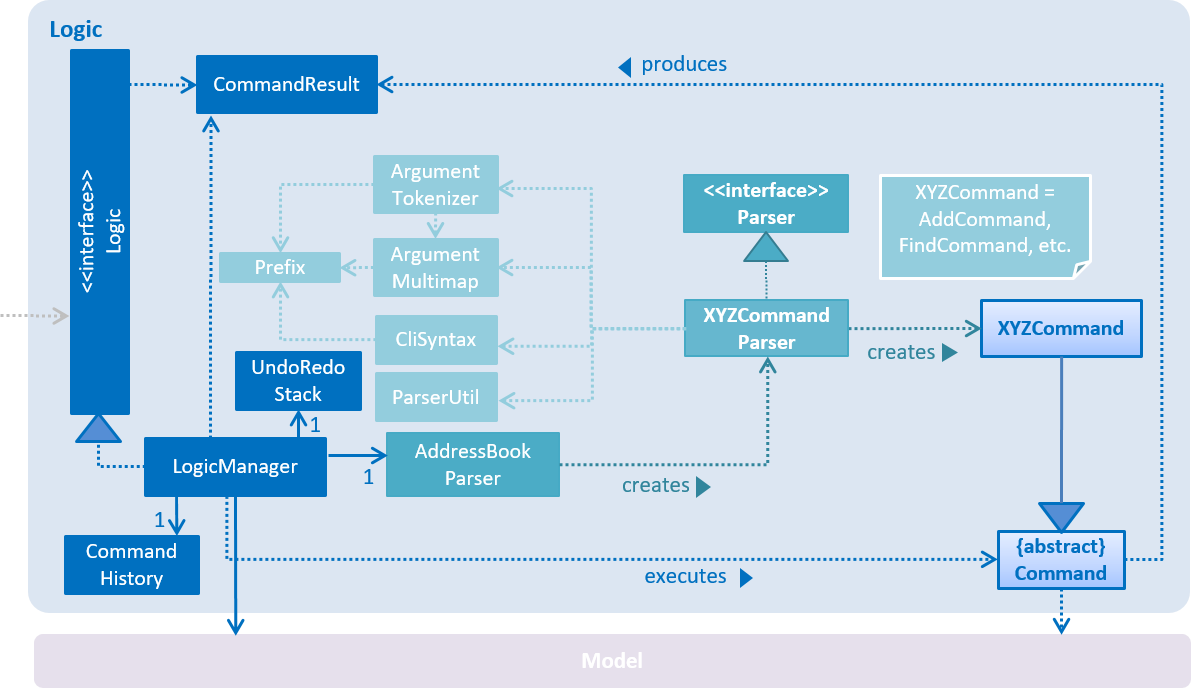
Figure 2 : Class Diagram of the Logic component
3.2. Events-Driven nature of the design
The Sequence Diagram below (Refer to Figure 3) shows how the components interact for the scenario where the user issues the command delete 1.
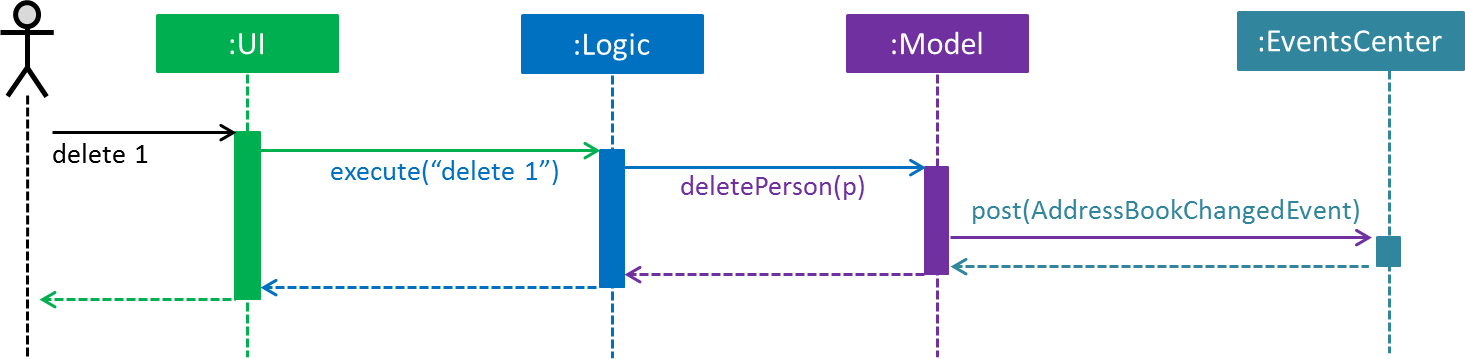
Figure 3 : Component interactions for delete 1 command (Part 1)
Note how the Model simply raises an AddressBookChangedEvent when the address book data are changed, instead of asking the Storage to save the updates to the hard disk.
|
The diagram below (Refer to Figure 4) shows how the EventsCenter reacts to that event, which eventually results in the updates being saved to the hard disk and the status bar of the UI being updated to reflect the 'Last Updated' time.
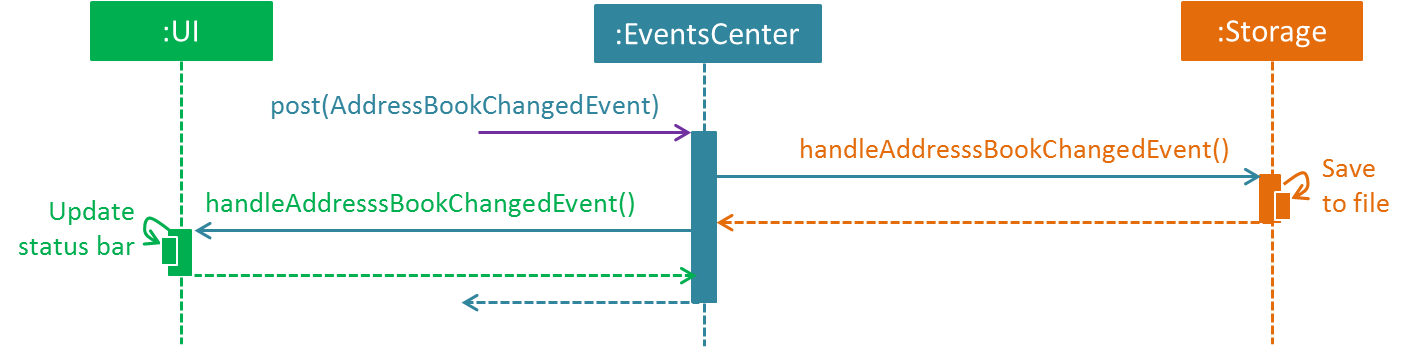
Figure 4 : Component interactions for delete 1 command (Part 2)
Note how the event is propagated through the EventsCenter to the Storage and UI without the Model having to be coupled to either of them. This is an example of how this Event-Driven approach helps us reduce direct coupling between components.
|
3.3. Components
This section explains the UI, Logic, Model and Storage component used in iContacts.
3.3.1. UI component
The UI component provides the API of Graphical User Interface. The figure below (Refer to Figure 5) shows the structure of the UI component.
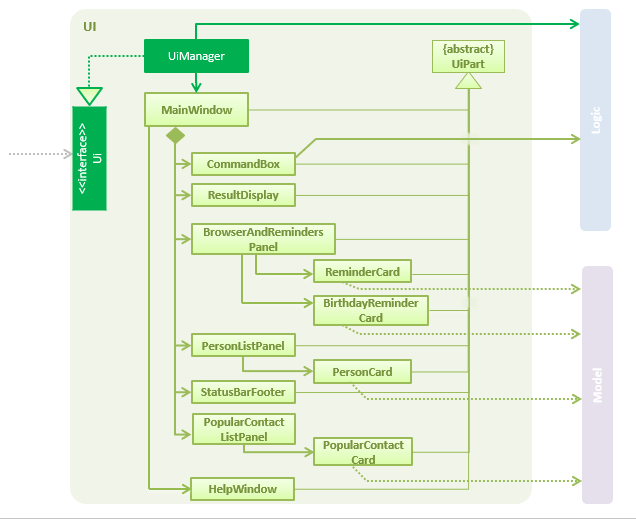
Figure 5 : Structure of the UI component
API : Ui.java
The UI consists of a MainWindow that is made up of parts e.g.CommandBox, ResultDisplay, PersonListPanel, StatusBarFooter, BrowserPanel etc. All of these, including the MainWindow, inherit from the abstract UiPart class.
The UI component uses JavaFx UI framework. The layout of these UI parts is defined in matching .fxml files that are in the src/main/resources/view folder. For example, the layout of the MainWindow is specified in MainWindow.fxml.
The UI component
-
executes the user commands using the
Logiccomponent. -
binds itself to some data in the
Modelso that theUIcan auto-update when the data in theModelchanges. -
responds to events raised from various parts of iContacts and updates the
UIaccordingly.
3.3.2. Logic component
The Logic component deals with how each command and its parser would be executed in an event-driven design. The figures below (Refer to Figures 6, 7) shows the structure of the Logic component.
Figure 6 : Structure of the Logic component
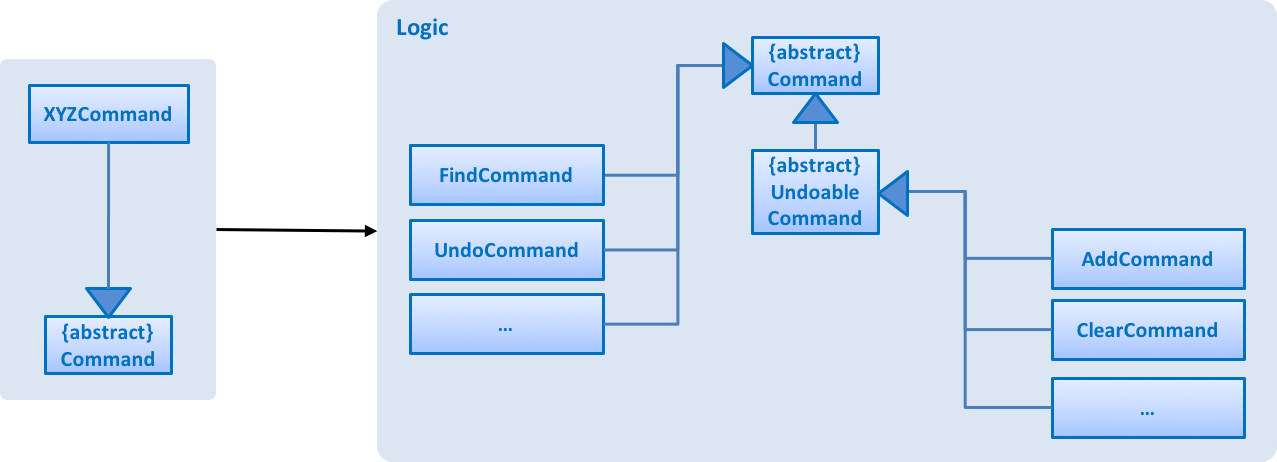
Figure 7 : Structure of Commands in the Logic component. This diagram shows finer details concerning XYZCommand and Command in Figure 6
API :
Logic.java
The Logic component uses the AddressBookParser class to parse the user command. This results in a Command object which is executed by the LogicManager. The command execution can affect the Model (e.g. adding a person) and/or raise events. The result of the command execution is encapsulated as a CommandResult object which is passed back to the UI.
The figure below (Refer to Figure 8) shows the sequence diagram of interactions within the Logic component for the execute("delete 1") API call.
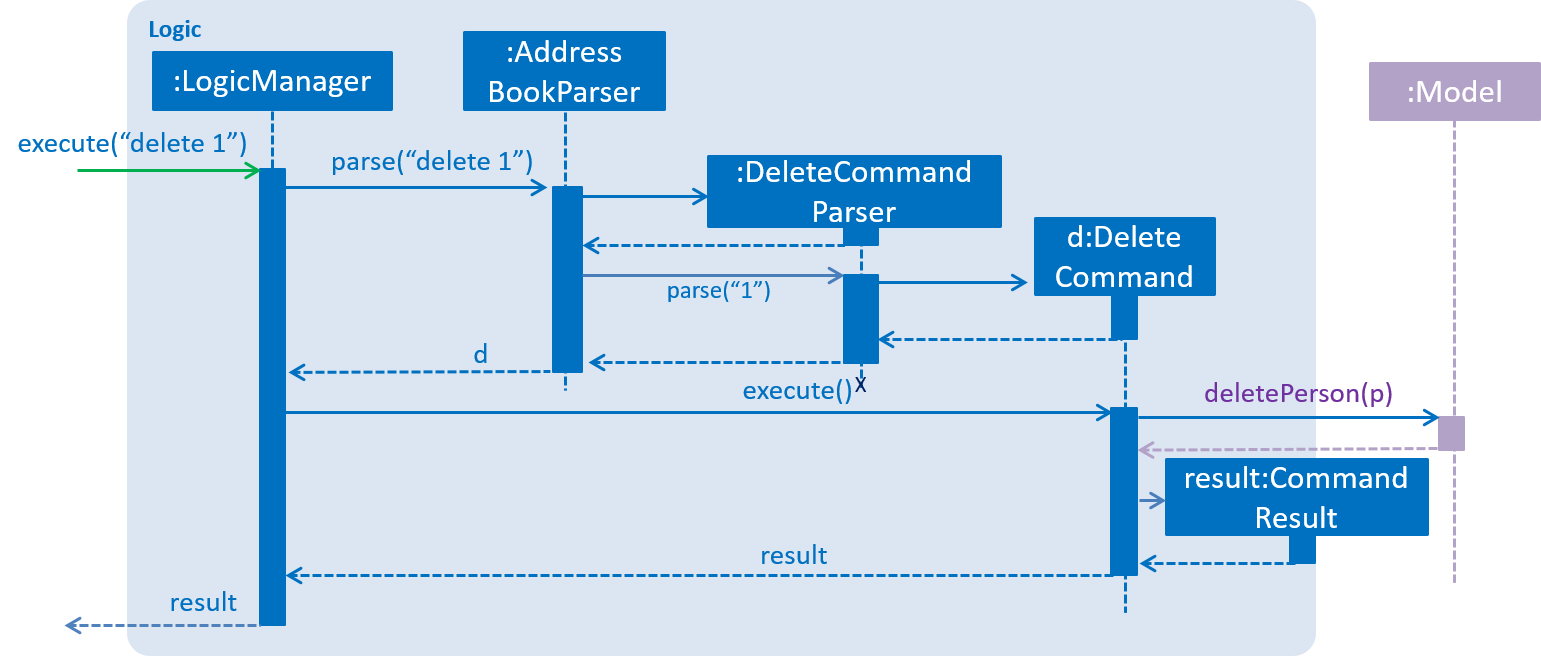
Figure 8 : Interactions inside the Logic component for the delete 1 command
3.3.3. Model component
The Model component handles the contacts in the address book and all its stored details in data structures which provide APIs to create, read, update and delete the contacts. The figure below (Refer to Figure 9) shows the structure of the Model component.
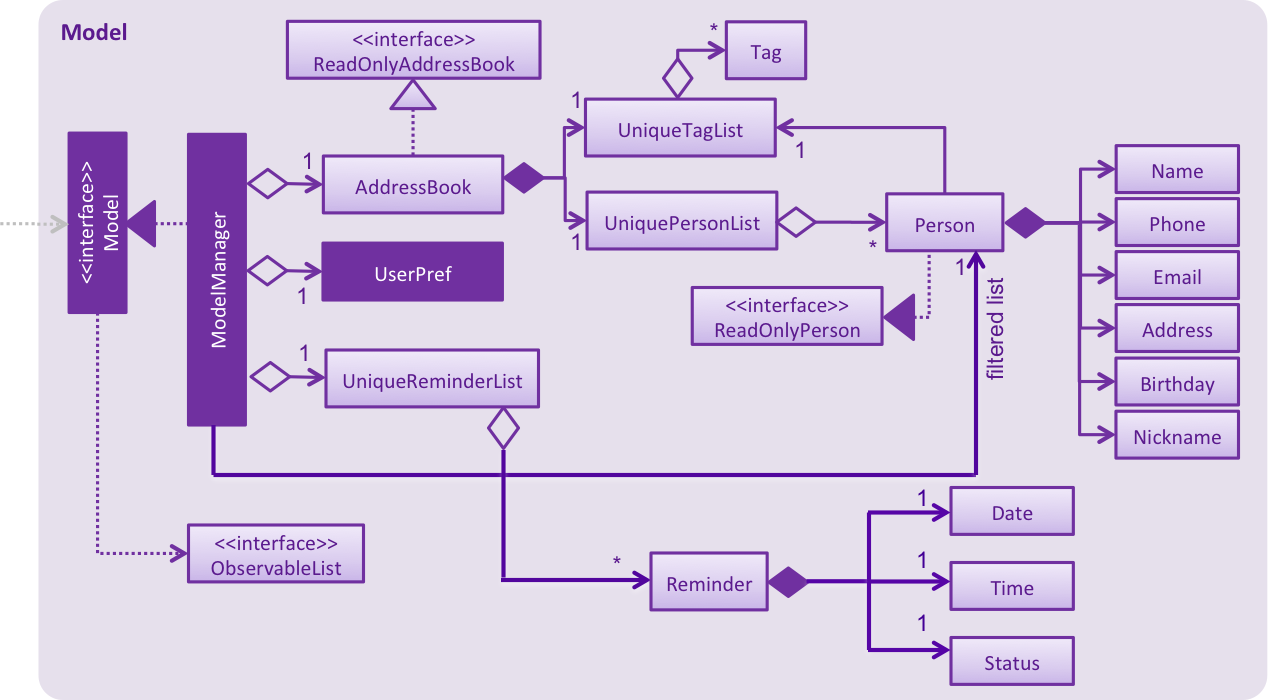
Figure 9 : Structure of the Model component
API : Model.java
The Model component
-
stores a
UserPrefobject that represents the user’s preferences. -
stores the address book data.
-
exposes an unmodifiable
ObservableList<ReadOnlyPerson>that can be 'observed' e.g. theUIcan be bound to this list so that theUIautomatically updates when the data in the list change. -
does not depend on any of the other three components (
UI,LogicandStorage).
3.3.4. Storage component
The Storage component handles the storage of all data of the address book in the local device. The figure below (Refer to Figure 10) shows the structure of the Storage component.
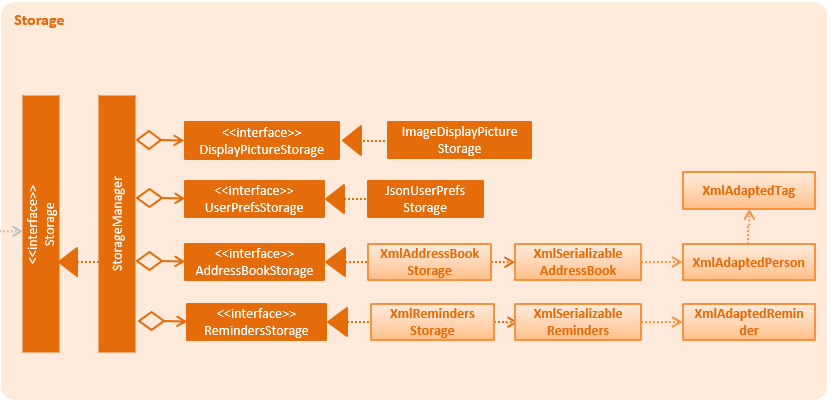
Figure 10 : Structure of the Storage component
API : Storage.java
The Storage component
-
can save
UserPrefobjects in json format and read it back. -
can save the address book data in xml format and read it back.
-
can save the reminder data in xml format and read it back.
3.4. Common classes
Classes used by multiple components are in the seedu.addressbook.commons package.
4. Implementation
This section describes some noteworthy details on how certain features are implemented, as well as design considerations for some features.
4.1. Filter mechanism
The FilterCommand uses the NameAndTagsContainsKeywordsPredicate to filter the persons with matching name and/or tags. It accepts the List<String> nameKeywords and List<String> tagKeywords as parameters that are parsed by the FilterCommandParser. The code snippet below is the constructor for the class:
public class NameAndTagsContainsKeywordsPredicate {
    public NameAndTagsContainsKeywordsPredicate(List<String> nameKeywords, List<String> tagKeywords) {
        this.nameKeywords = nameKeywords;
        this.tagKeywords = tagKeywords;
    }
}
The method test(ReadOnlyPerson person) iterates through the nameKeywords and the tagKeywords to find a match of every person from the address book.
Below is an extract of the method test(ReadOnlyPerson person). The method countTagMatches(person) counts and returns the number of matches between the tags of the person and the tags in the tagKeywords. If the tagsMatchedCount is equal to the size of the tagKeywords, this means all the keywords in the tagKeywords match. The hasTag will then be set to true.
public class NameAndTagsContainsKeywordsPredicate {
    @Override
    public boolean test(ReadOnlyPerson person) {
        boolean hasTag = false;

        int numTagKeywords = tagKeywords.size();
        int tagsMatchedCount = 0;
        if (!tagKeywords.isEmpty()) {
            tagsMatchedCount = countTagMatches(person);
        }

        if (tagsMatchedCount == numTagKeywords) {
            hasTag = true;
        }
}
Below is an extract of the same method for name. Each keywords in the nameKeywords will be compared against the name list retrieved from the getName() method of the Person class. If all the keywords match, the hasName will be set to true.
public class NameAndTagsContainsKeywordsPredicate {
    @Override
    public boolean test(ReadOnlyPerson person) {
        boolean hasName = false;
            if (!nameKeywords.isEmpty()) {
                hasName = nameKeywords.stream().allMatch(nameKeywords -> StringUtil
                .containsWordIgnoreCase(person.getName().fullName, nameKeywords));
        }
    }
}
For the FilterCommand to work properly, either the nameKeywords or the tagKeywords must be non-empty.
Design Considerations
Aspect: Should similar search commands be separated
Alternative 1 (current choice): Create a separate command to search for contacts that match all keywords.
Pros: Users will not be confused between the functionality of the find and filter commands.
Cons: Users have to remember an additional command.
Alternative 2: Modify the FindCommand to allow users the option to search contacts that either match any keywords or match all keywords.
Pros: Lesser command for the users to remember when searching for contacts.
Cons: Implementation can be more complicated as there is a need to address both OR search and AND search on the same command.
4.2. Export mechanism
The ExportCommand uses XmlAddressBookStorage class to generate a xml file based on a given range and saves it to the path provided. It takes in two String values range and path. Below is the constructor for the class:
public class ExportCommand extends Command {
    public ExportCommand(String range, String path) {
        requireNonNull(range);
        requireNonNull(path);

        this.range = range;
        this.path = path;
        exportBook = new AddressBook();
    }
}
The method getRangefromInput() splits the range using a separator and returns a String array for the different values in the range.
Below is an extract of the method getRangefromInput():
public class ExportCommand extends Command {
    private String[] getRangeFromInput() {
        private String[] getRangeFromInput() {
            String[] splitStringComma = this.range.split(",");

            return splitStringComma;
        }
    }
}
To determine which contacts should be added to the exportBook we have to check the the user input. There are three cases:
-
All (Priority)
-
if the word
allis present in the user input, we will just export all the contacts from the last shown list.
-
-
Specific index (e.g. 1, 2, 3)
-
if the user input contains a specific index, we will add that index (one-based) to the
exportBook.
-
-
Range of indexes (e.g. 1-5,8-10)
-
if the user input contains a range which is identified by the
-character, we will add that range of index (one-based) to theexportBook.
-
Below is the code snippet to identify the three cases in the user input:
public class ExportCommand extends Command {

    @Override
    public CommandResult execute() throws CommandException {
        String[] multipleRange = getRangeFromInput();

        if (multipleRange[0].equals("all")) {
            exportAll();
        } else {
            for (int i = 0; i < multipleRange.length; i++) {
                if (multipleRange[i].contains("-")) {
                    String[] rangeToExport = multipleRange[i].split("-");
                    try {
                        exportRange(Integer.parseInt(rangeToExport[0]), Integer.parseInt(rangeToExport[1]));
                    } catch (NumberFormatException e) {
                        throw new CommandException(MESSAGE_EXPORT_FAIL);
                    }

                } else {
                    try {
                        exportSpecific(Integer.parseInt(multipleRange[i]));
                    } catch (NumberFormatException e) {
                        throw new CommandException(MESSAGE_EXPORT_FAIL);
                    }
                }
            }
        }
        /... storage is resolved here ...
    }
}
The final step is to create the xml file from the exportBook.
Below is the code snippet to export the data into an xml file using AddressBookStorage.
public class ExportCommand extends Command {
    @Override
    public CommandResult execute() throws CommandException {

    /... the exporting is resolved here ...

        try {
            AddressBookStorage storage = new XmlAddressBookStorage(path + ".xml");
            storage.saveAddressBook(exportBook);
        } catch (IOException ioe) {
            return new CommandResult(MESSAGE_EXPORT_FAIL);
        }
        return new CommandResult(MESSAGE_EXPORT_SUCCESS);
    }
}
4.3. Import mechanism
The ImportCommand uses XmlAddressBookStorage to generate a temporary AddressBook object from a given path. It takes in a String value path. The command then adds the contacts found in the temporary AddressBook object into the main address book object. Below is the constructor for the class:
public class ImportCommand extends UndoableCommand {
    public ImportCommand(String path) {
        this.path = path;
        this.addressBookStorage = new XmlAddressBookStorage(path);
        numSuccess = 0;
        numDuplicates = 0;
    }
}
The ImportCommand first checks if an AddressBook object can be initialised from the specified path, and if it does it initialises a new Person object and adds it into the main AddressBook object through the model. Below is the code snippet:
public class ImportCommand extends UndoableCommand {

    @Override
    public CommandResult executeUndoableCommand() throws CommandException {
        try {
            if (addressBookStorage.readAddressBook().isPresent()) {
                this.addressBook = new AddressBook(addressBookStorage.readAddressBook().get());
                for (ReadOnlyPerson person : this.addressBook.getPersonList()) {
                    Person personToAdd = new Person(person);
                    personToAdd.setPopularityCounter(new PopularityCounter());
                    personToAdd.setDisplayPicture(new DisplayPicture(""));
                    try {
                        model.clearSelection();
                        model.showDefaultPanel();
                        model.addPerson(personToAdd);
                        numSuccess++;
                    } catch (DuplicatePersonException e) {
                        numDuplicates++;
                    }
                }
            } else {
                throw new CommandException(String.format(MESSAGE_INVALID_FILE, path));
            }
        } catch (DataConversionException | IOException e) {
            throw new CommandException(String.format(MESSAGE_INVALID_FILE, path));
        }

        return new CommandResult(String.format(MESSAGE_SUCCESS, numSuccess, numDuplicates));
    }
}
Design Considerations
Aspect: Should PopularityCounter and DisplayPicture be set to the default value
Alternative 1 (current choice): Both PopularityCounter and DisplayPicture should be set to the default value.
Pros: Does not affect the contact’s PopularityCounter and allows the user to set their own preferred DisplayPicture of a contact.
Cons: Users will not be able to share DisplayPicture. and
Alternative 2: Import the contacts with both `PopularityCounterDisplayPicture unchanged.
Pros: DisplayPicture will be imported into iContacts.
Cons: The PopularityCounter of the user’s contacts will be inaccurate.
4.4. Find mechanism
The FindCommand uses NameContainsKeywordsPredicate to find contacts with matching names or nicknames. It accepts List<String> nameKeywords as the parameter that is parsed by FindCommandParser. Below is the constructor for the class:
public FindCommand(NameContainsKeywordsPredicate predicate) {
        this.predicate = predicate;
    }
The method test(ReadOnlyPerson person) iterates through nameKeywords to find a match with the name or nickname of every person from the address book.
Below is an extract of the method test(ReadOnlyPerson person.
   @Override
    public boolean test(ReadOnlyPerson person) {
        return keywords.stream()
                .anyMatch(keyword -> StringUtil.containsWordIgnoreCase(person.getName().fullName, keyword))
                || keywords.stream()
                .anyMatch(keyword -> StringUtil.containsWordIgnoreCase(person.getNickname().value, keyword));
    }
For the FindCommand to work properly nameKeywords must be non-empty. The code extract below checks for empty inputs:
    public FindCommand parse(String args) throws ParseException {
        String trimmedArgs = args.trim();
        if (trimmedArgs.isEmpty()) {
            throw new ParseException(
                    String.format(MESSAGE_INVALID_COMMAND_FORMAT, FindCommand.MESSAGE_USAGE));
        }

        String[] nameKeywords = trimmedArgs.split("\\s+");

        return new FindCommand(new NameContainsKeywordsPredicate(Arrays.asList(nameKeywords)));
    }
4.5. Sorting mechanism
The SortCommand uses a SortedList that is initialised with the current filteredPerson and is sorted using a comparator. Below is the code snippet:
sortedfilteredPersons = new SortedList<>(filteredPersons);

@Override
public void sortFilteredPersonList() {

    Comparator<ReadOnlyPerson> sortByName = (o1, o2) -> o1.getName().fullName.compareTo(o2.getName().fullName);
    sortedfilteredPersons.setComparator(sortByName);
    indicateAddressBookChanged();
}
4.6. Undo/Redo mechanism
The undo/redo mechanism is facilitated by an UndoRedoStack, which resides inside LogicManager. It supports undoing and redoing of commands that modify the state of the address book (e.g. add, edit). Such commands will inherit from UndoableCommand.
UndoRedoStack only deals with UndoableCommands. Commands that cannot be undone will inherit from Command instead. The following diagram (Refer to Figure 11) shows the inheritance diagram for commands:
Figure 11 : Inheritance diagram for commands
As you can see from the diagram, UndoableCommand adds an extra layer between the abstract Command class and concrete commands that can be undone, such as the DeleteCommand. Note that extra tasks need to be done when executing a command in an undoable way, such as saving the state of the address book before execution. UndoableCommand contains the high-level algorithm for those extra tasks while the child classes implement the details of how to execute the specific command. Note that this technique of putting the high-level algorithm in the parent class and lower-level steps of the algorithm in child classes is also known as the template pattern.
Commands that are not undoable are implemented this way:
public class ListCommand extends Command {
    @Override
    public CommandResult execute() {
        // ... list logic ...
    }
}
With the extra layer, the commands that are undoable are implemented this way:
public abstract class UndoableCommand extends Command {
    @Override
    public CommandResult execute() {
        // ... undo logic ...

        executeUndoableCommand();
    }
}

public class DeleteCommand extends UndoableCommand {
    @Override
    public CommandResult executeUndoableCommand() {
        // ... delete logic ...
    }
}
Suppose that the user has just launched the application. The UndoRedoStack will be empty at the beginning.
The user executes a new UndoableCommand, delete 5, to delete the 5th person in the address book. The current state of the address book is saved before the delete 5 command executes. The delete 5 command will then be pushed onto the undoStack (the current state is saved together with the command) (Refer to Figure 12).
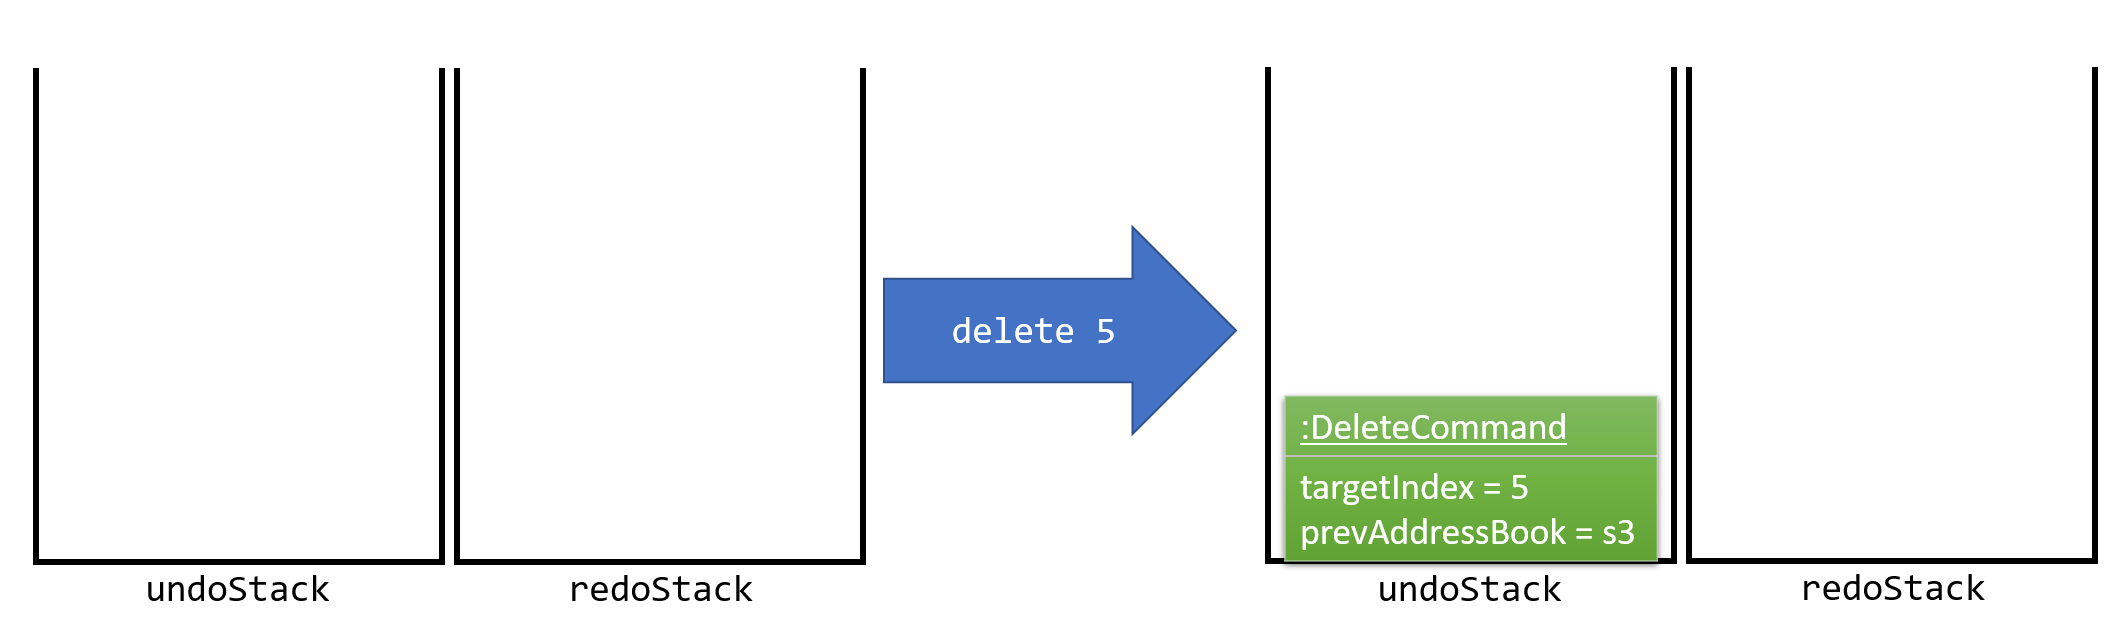
Figure 12 : Stack diagram after executing Delete command
As the user continues to use the program, more commands are added into the undoStack. For example, the user may execute add n/David … to add a new person (Refer to Figure 13).
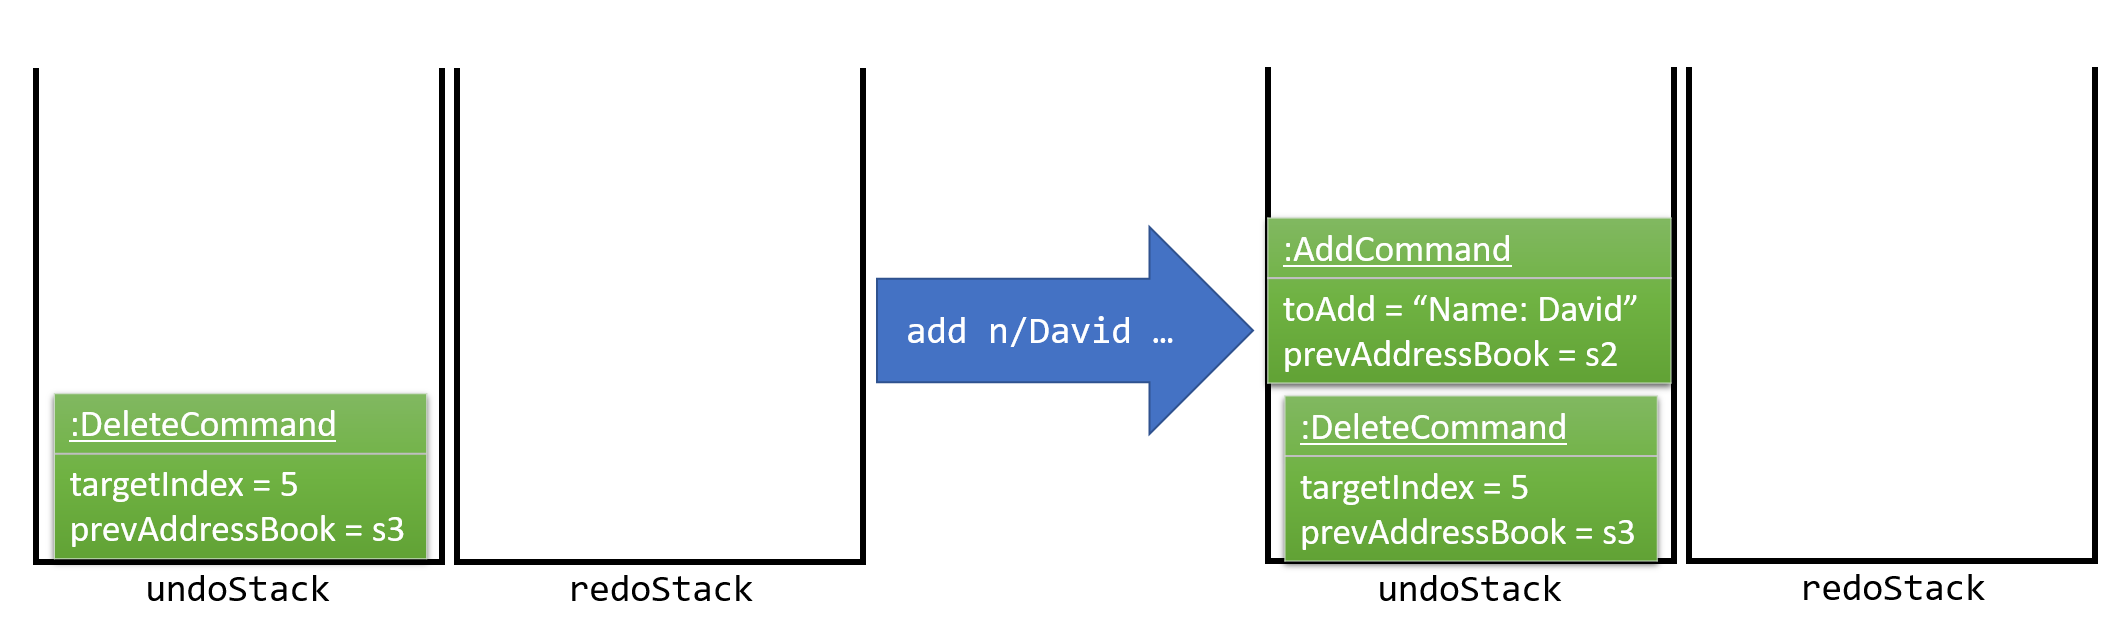
Figure 13 : Stack diagram after executing Add command
If a command fails its execution, it will not be pushed to the UndoRedoStack at all.
|
The user now decides that adding the person was a mistake, and decides to undo that action using undo.
We will pop the most recent command out of the undoStack and push it back to the redoStack. We will restore the address book to the state before the add command executed (Refer to Figure 14).
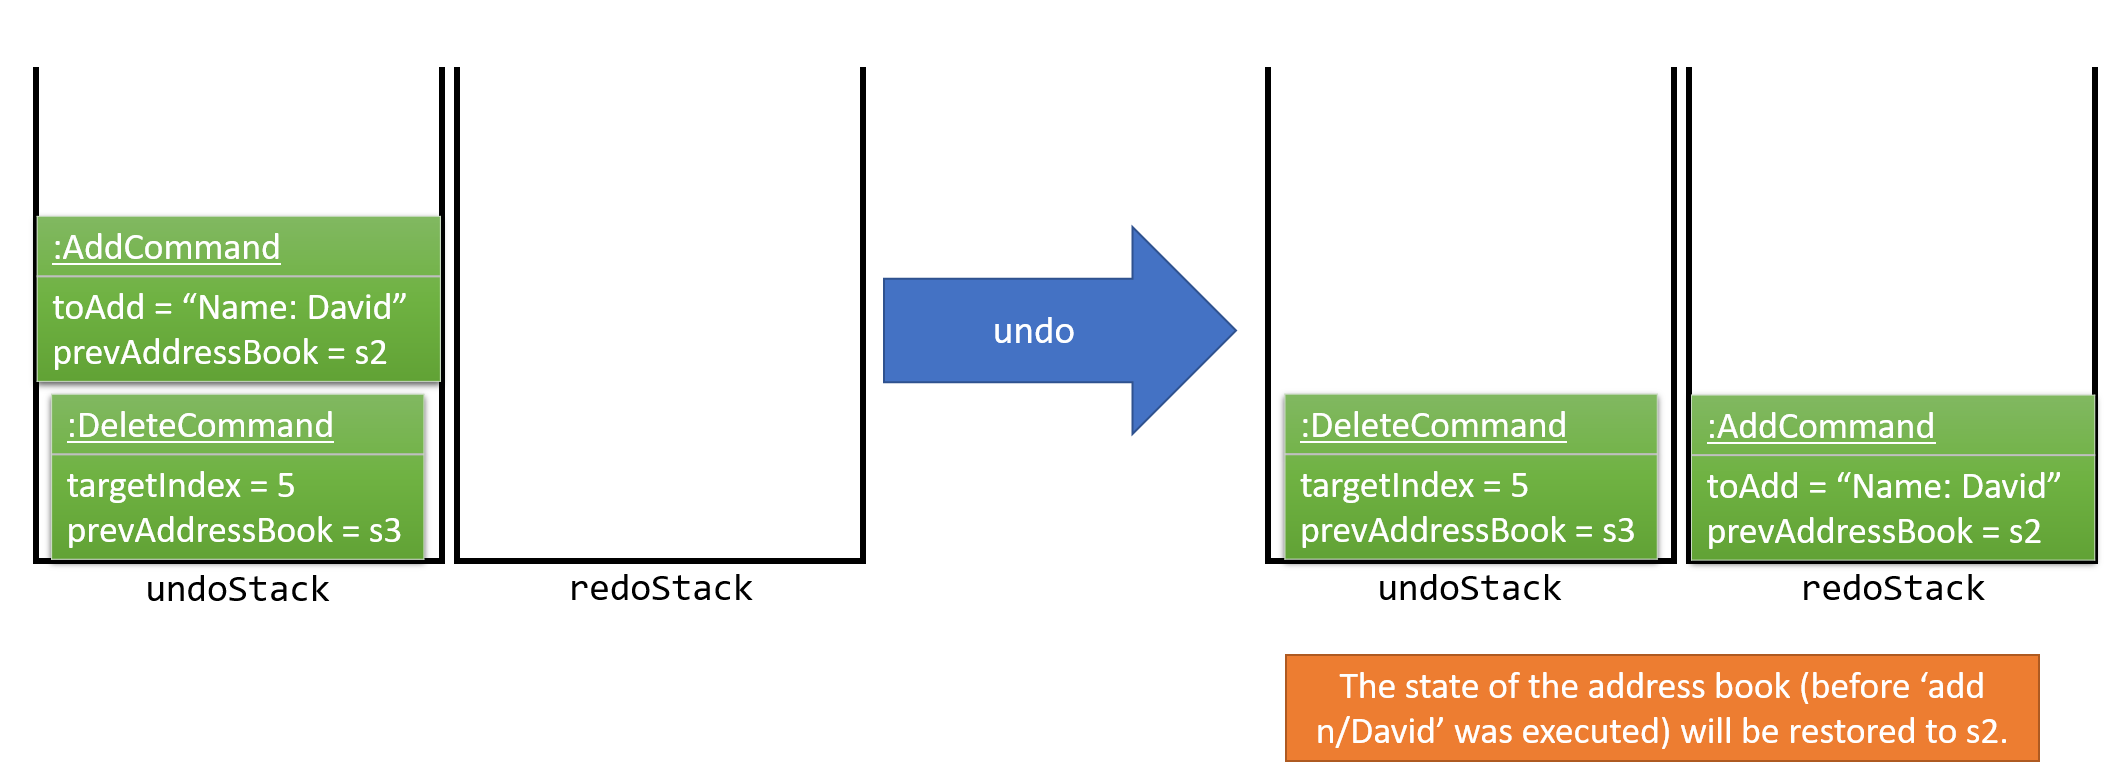
Figure 14 : Stack diagram after executing Undo command
If the undoStack is empty, then there are no other commands left to be undone, and an Exception will be thrown when popping the undoStack.
|
The following sequence diagram (Refer to Figure 15) shows how the undo operation works:
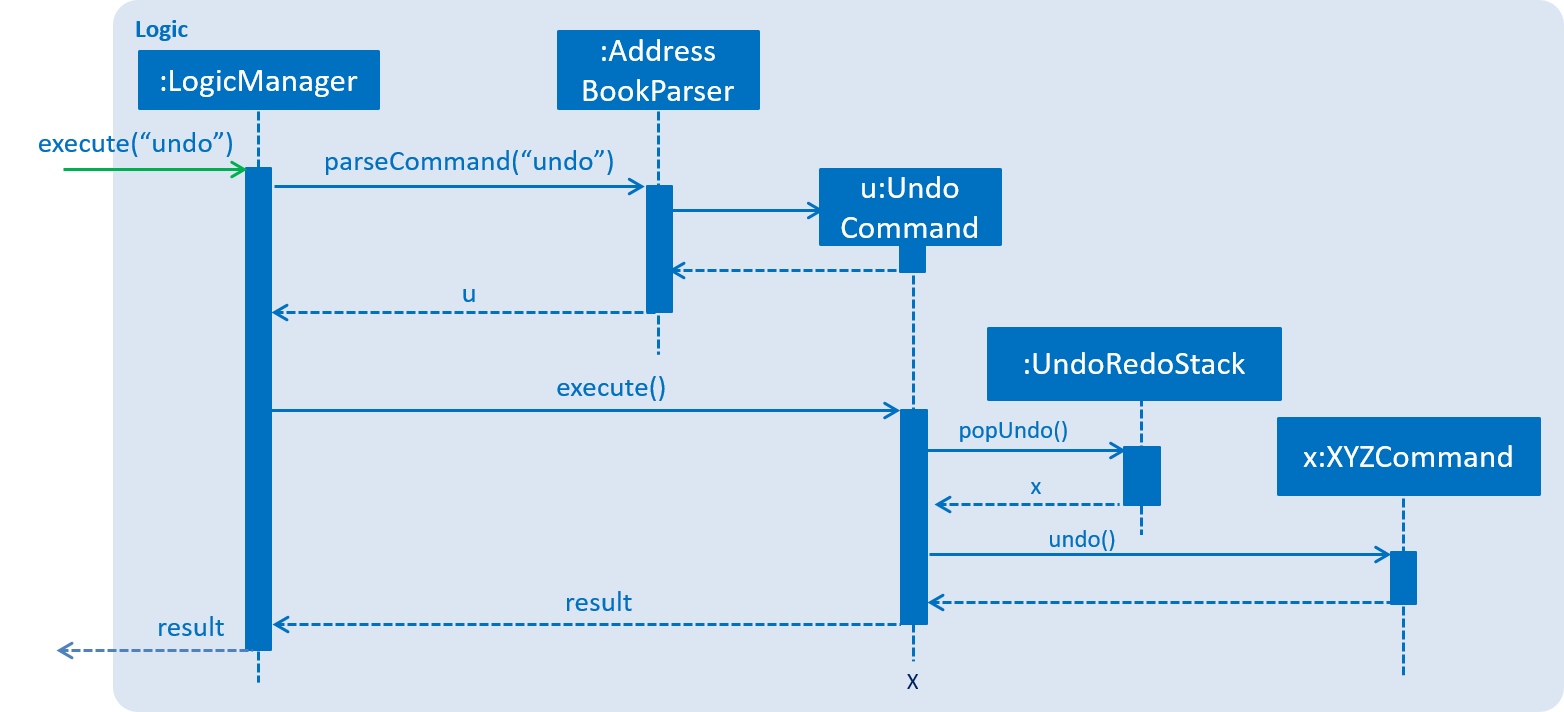
Figure 15 : Sequence diagram of the undo operation
The redo operation does the exact opposite (pops from redoStack, push to undoStack, and restores the address book to the state after the command is executed).
If the redoStack is empty, then there are no other commands left to be redone, and an Exception will be thrown when popping the redoStack.
|
The user now decides to execute a new command, clear. As before, clear will be pushed into the undoStack. This time the redoStack is no longer empty. It will be purged as it no longer make sense to redo the add n/David command (this is the behavior that most modern desktop applications follow) (Refer to Figure 16).
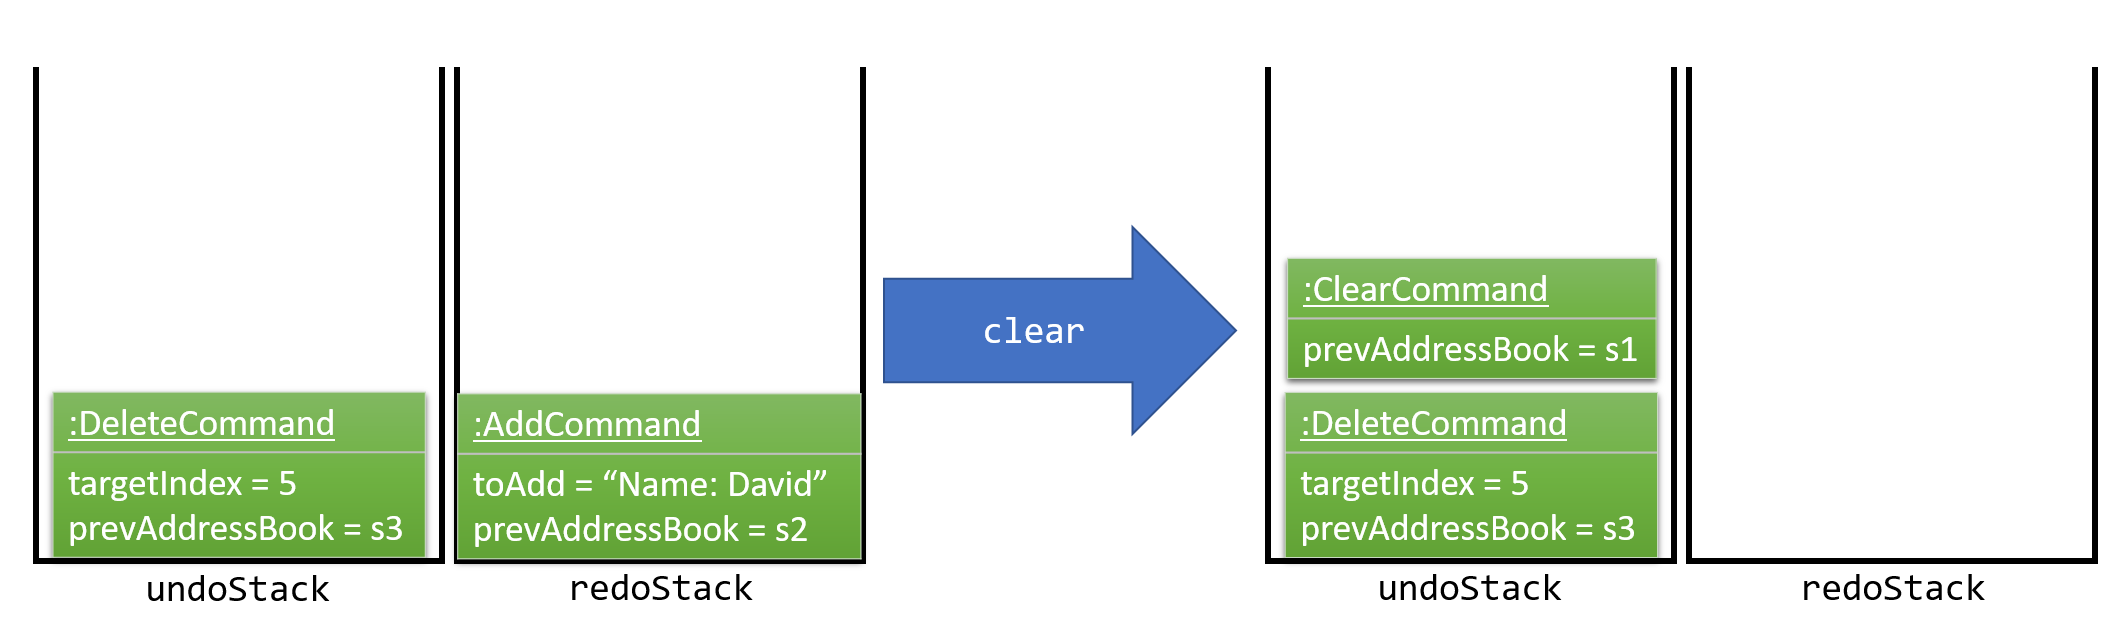
Figure 16 : Stack diagram after executing Clear command
Commands that are not undoable are not added into the undoStack. For example, list, which inherits from Command rather than UndoableCommand, will not be added after execution (Refer to Figure 17):
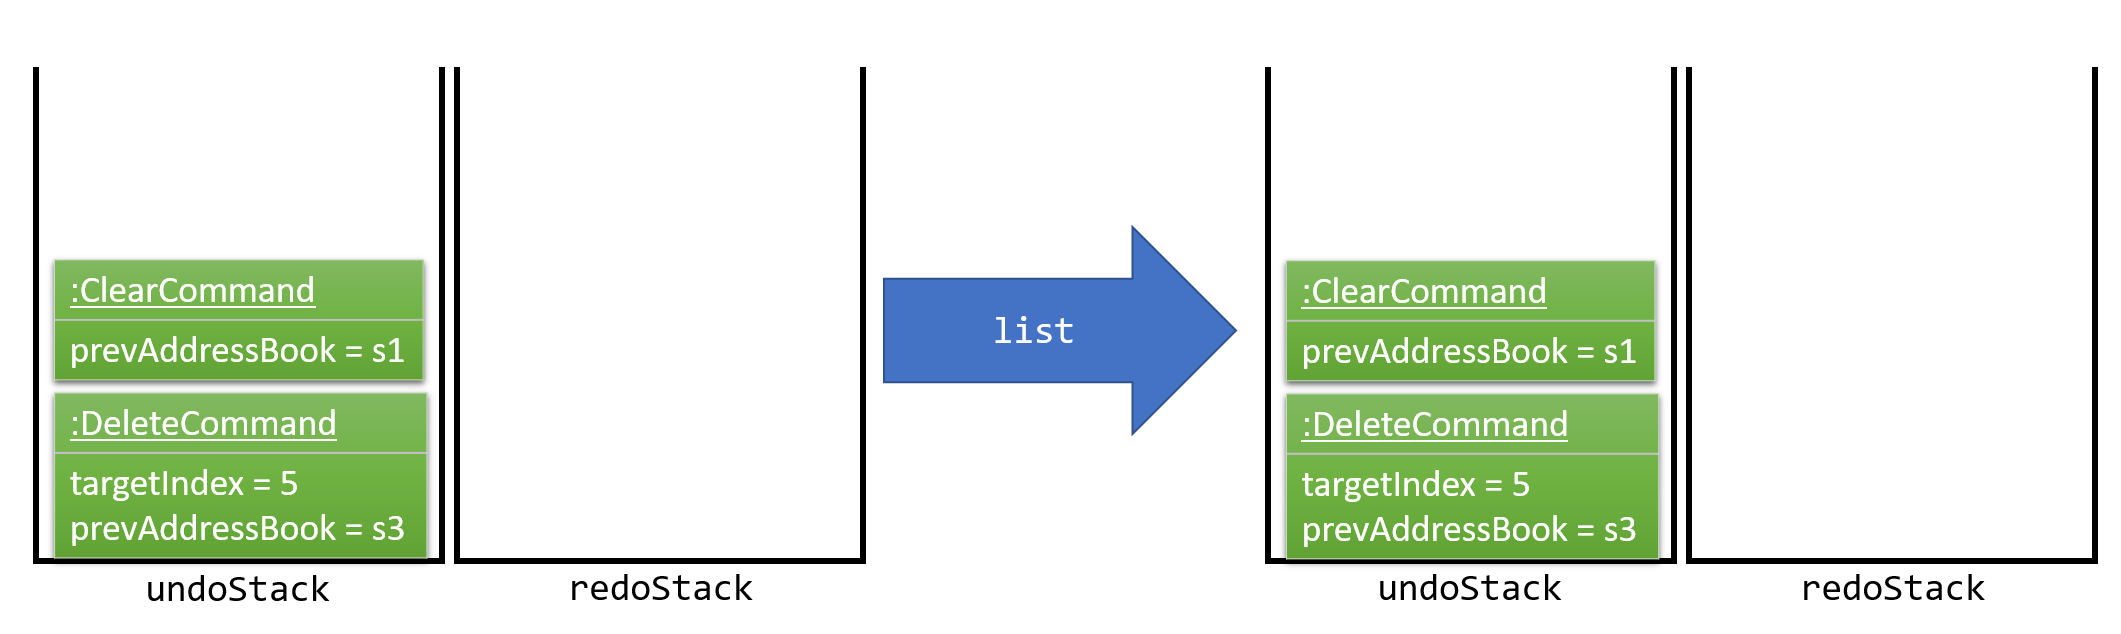
Figure 17 : Stack diagram remains unchanged after executing List command
The following activity diagram (Refer to Figure 18) summarize what happens inside the UndoRedoStack when a user executes a new command:
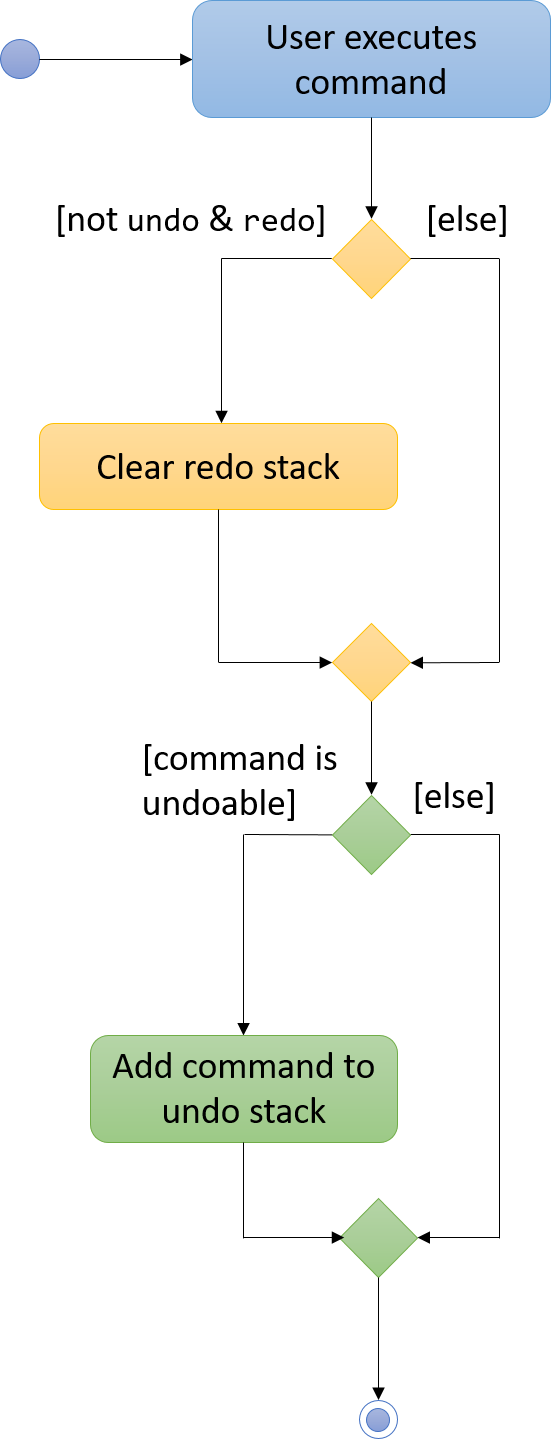
Figure 18 : Activity diagram for UndoRedoStack
Design Considerations
Aspect: Implementation of UndoableCommand
Alternative 1 (current choice): Add a new abstract method executeUndoableCommand().
Pros: We will not lose any undone/redone functionality as it is now part of the default behaviour. Classes that deal with Command do not have to know that executeUndoableCommand() exist.
Cons: Will be hard for new developers to understand the template pattern.
Alternative 2: Just override execute().
Pros: It will not involve the template pattern, easier for new developers to understand.
Cons: Classes that inherit from UndoableCommand must remember to call super.execute(), or lose the ability to undo/redo.
Aspect: How undo & redo executes
Alternative 1 (current choice): Save the entire address book.
Pros: Will be easy to implement.
Cons: May have performance issues in terms of memory usage.
Alternative 2: Individual command knows how to undo/redo by itself.
Pros: Will use less memory (e.g. for delete, just save the person being deleted).
Cons: Care should be taken to ensure that the implementation of each individual command are correct.
Aspect: Type of commands that can be undone/redone
Alternative 1 (current choice): Only include commands that modifies the address book (add, clear, edit).
Pros: We only revert changes that are hard to change back (the view can easily be re-modified as no data are lost).
Cons: User might think that undo also applies when the list is modified (undoing filtering for example), only to realize that it does not do that, after executing undo.
Alternative 2: Include all commands.
Pros: Might be more intuitive for the user.
Cons: User have no way of skipping such commands if he or she just want to reset the state of the address book and not the view.
Additional Info: See our discussion here.
Aspect: Data structure to support the undo/redo commands
Alternative 1 (current choice): Use separate stack for undo and redo
Pros: Will make it easy to understand for new Computer Science student undergraduates, who are likely to be the new incoming developers of our project.
Cons: Logic is duplicated twice. For example, when a new command is executed, we must remember to update both HistoryManager and UndoRedoStack.
Alternative 2: Use HistoryManager for undo/redo
Pros: Won’t require the need to maintain a separate stack, and just reuse what is already in the codebase.
Cons: It will require dealing with commands that have already been undone: We must remember to skip these commands. Violates Single Responsibility Principle and Separation of Concerns as HistoryManager now needs to do two different things.
4.7. Display Picture mechanism
The displaypic command adds or updates the display picture for the contact specified. The image is then displayed as ImageView in PersonCard and DetailsPanel.
The arguments of the command are INDEX and PATHOFIMAGE. The image needs to be present in the local device of the user.
The Display Picture command is implemented in a way so that the image is read from the user specified path. It is then stored in iContacts directory so that the image is never lost.
By executing the given code below, a new folder named 'pictures/' is created if it is missing. The folder is used to store the images.
public void createPictureStorageFolder() throws IOException {
        requireNonNull(filePath);

        logger.info("Picture folder "  + filePath + " created if missing");
        File file  = new File(filePath);
        FileUtil.createIfMissing(file);
    }
Since the command has to read and write an image, the Storage architectural style is used and extended to Display pictures.
The following UML diagram shows the Storage Architecture for reading and writing of image file (Refer to Figure 19):
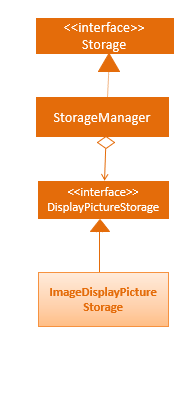
Figure 19 : UML Diagram for the extended Storage Component.
This command works by retrieving the image using BufferedImage. The command extracts the image from the specified absolute path of image e.g. C:\Users\Admin\Desktop\My files\pic.jpg
It then stores the image in the folder called /pictures/ present in the same directory as .jar by giving it a unique hashcode based on the user’s email address.
The reading and writing of images is done using the ImageIO class.
An event handler is used to notify the UI and Storage component of the changes made in image and its name.
The sequence diagram for adding a display picture is shown below (Refer to Figure 20):
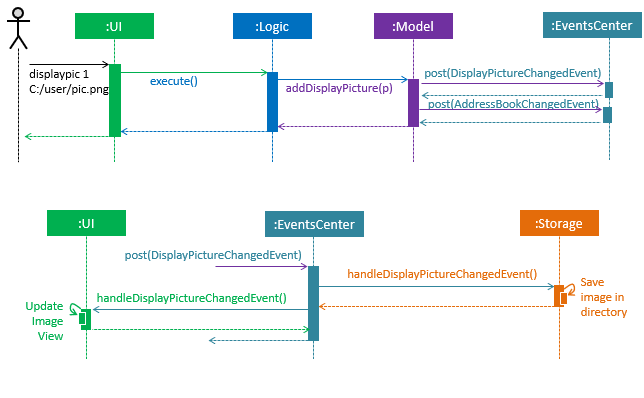
Figure 20 : Sequence Diagram for Display Picture Command.
The binder for refreshing the image every time the picture is updated is implemented by the following function:
public class PersonCard extends UiPart<Region> {
    private void assignImage(ReadOnlyPerson person) {

        Image image = new Image("file:" + "pictures/" + person.getDisplayPicture().getPath() + ".png",
                            IMAGE_WIDTH, IMAGE_HEIGHT, false, false);

        displayPicture.setFill(new ImagePattern(image));
    }
}
The Display Picture mechanism is done by using ImageView/ImagePattern in JavaFX which is a part of the UI Component.
The Circle shape is used for better UI/UX design and is filled with the ImagePattern.
The wireframe used to display the image for each person is shown below (Refer to Figure 21):
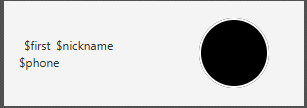
Figure 21 : Wireframe for the PersonCard.
The new image stored in directory is given a unique name which is formed using the hash code of the unique email address of each contact. The following code is used to set the name of image as the hash code:
public class DisplayPictureCommand extends Command {

    @Override
    public CommandResult execute() throws CommandException, IOException {
        /... executes function of Reading and Writing Image ...

        displayPicture.setPath(readAndStoreImage.execute(displayPicture.getPath(),
                            personToEdit.getEmail().hashCode())); // image name formed in this line
    }
}
Reason for this type of implementation
The command is implemented in this manner because of the following:
-
By specifying the index, there is no ambiguity as to who should be assigned the display picture.
-
The
PATHOFIMAGEmust be an absolute path on the local device to make sure the image is referenced. -
The image is stored in directory with a unique name to avoid conflict. The hash code of the user’s email address is used to maintain uniqueness.
-
The task is done using CLI to follow project requirements.
-
The image is stored in png format to ensure maximum compatibility.
-
In case of image corruption/deletion, care is taken to avoid hanging of UI and display the default image. This is done by checking
file.exists().
Design Considerations
Aspect: At what stage should the image be read and stored
Alternative 1 (current choice): Make proper Storage Architecture for reading and writing of Image.
Pros: It will follow the existing Architectural Design and Software Engineering Principles like OCP.
Cons: It will take more time and will be tougher to implement.
Alternative 2: Invoke 'ReadAndStoreImage' from Logic component.
Pros: : It will be easier for new developers to understand the sequence diagram and maintains event-driven nature.
Cons: It will cause bad architectural design and will not follow the pre-existing pattern and moreover will defy the Law of Demeter.
Aspect: How should the image be taken from user
Alternative 1 (current choice): User has to enter the absolute path of image by checking his local device.
Pros: It will be a complete CLI process.
Cons: It might be problematic for user to copy and paste and might result in error.
Alternative 2: Pop up a FileChooser after the command is entered.
Pros: It will be easier for users to mention the correct image quickly.
Cons: It will no longer be a complete CLI process.
4.8. Location mechanism
The location command is implemented in the form of an event-driven mechanism .
The diagram below (Refer to Figure 22) shows the sequence diagram for the command execution:
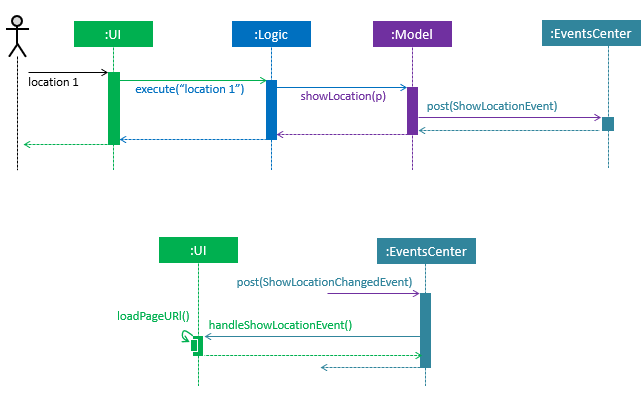
Figure 22 : Sequence diagram for the Location Command.
The execution of command raises an event ShowLocationEvent. This causes the BrowserAndReminderPanel to switch to Node Browser irrespective of the current state of the application.
The activity diagram for such case is shown below (Refer to Figure 23):
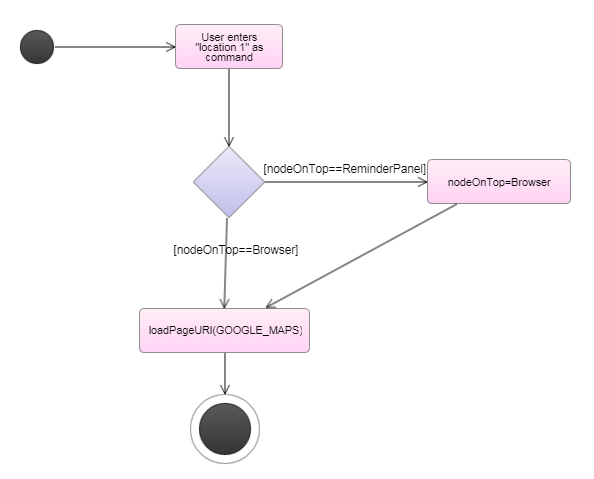
Figure 23 : Sequence diagram for the Location Command.
The following code below ensures the set up for the GUI:
private void setUpToShowLocation() {
    if (currentlyInFront == Node.REMINDERS) {
        setUpToShowBrowser();
        browser.toFront();
        currentlyInFront = Node.BROWSER;
    }
}
The URL for denoting the specified person’s address in Google Maps is set up through the following code:
public String loadPersonLocation(String address) {

        String[] splitAddressByWords = address.split("\\s");

        String keywordsOfUrl = "";

        for (String word: splitAddressByWords) {
            keywordsOfUrl += word;
            keywordsOfUrl += "+";
        }

        loadPage(GOOGLE_MAPS_URL + keywordsOfUrl);
}
Design Consideration
Aspect: What to use to show the location
Alternative 1 (current choice): Show using google maps url in BrowserPanel.
Pros: We will be able to get the location easily and accurately.
Cons: It could cause problem due to limited functionality of the URL.
Alternative 2: Use Google Maps API.
Pros: It will provide more functionality.
Cons: It could cause more resources to be used for the exact same feature and wouldn’t utilise pre-existing browser properly.
4.9. Email mechanism
The email command has various fields to denote the Recipients (Tag), Subject, Body and Service.
The email command allows the users to compose an email in the default browser with data such as recipients, subject and body.
The relation between them is shown in the UML diagram below (Refer to Figure 24):
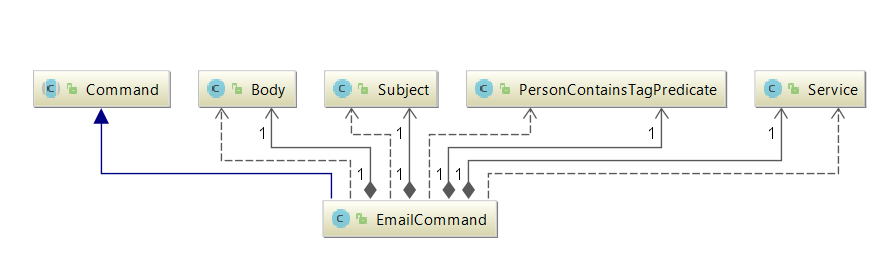
Figure 24 : UML Class Diagram for the Email Feature.
The command is parsed to get the Service, Tag, Subject and Body fields.
The parsing takes place in the following manner (Refer to Figure 25):
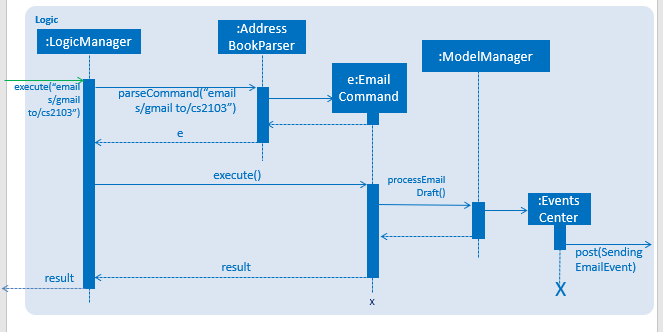
Figure 25 : Sequence diagram for parsing the Email Command.
The recipients are all contacts belonging to a particular tag.
The only two services offered are gmail and outlook as our target users are students.
|
The email command happens through an event driven mechanism. The below diagram (Refer to Figure 26) shows sequence diagram for it.
The execution of command raises an event SendingEmailEvent.
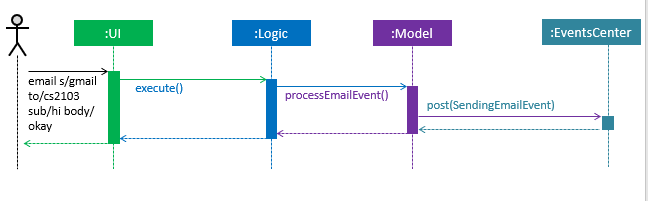
Figure 26 : Sequence diagram for the Email Command.
The URL for composing the mail is set up through the following code:
public static final String GMAIL_EMAIL_URL =
            "https://mail.google.com/mail/?view=cm&fs=1&tf=1&source=mailto&to=%1$s&su=%2$s&body=%3$s";

public static final String OUTLOOK_EMAIL_URL =
            "https://outlook.office.com/?path=/mail/action/compose&to=%1$s&subject=%2$s&body=%3$s";

Desktop.getDesktop().browse(new URI(String.format(GMAIL_EMAIL_URL, recipients, subject, body)));
Design Consideration
Aspect: Where to compose the mail
Alternative 1 (current choice): Opens the default browser of Desktop.
Pros: The default browser will have the user logged in to his email account.
Cons: High dependency on third party apps.
Alternative 2: Open in BrowserPanel.
Pros: No dependency on other apps.
Cons: It will not auto fill in the text due to older version of browser.
4.10. Frequently Visited Contacts mechanism
This feature brings in a new UI element called PopularContactList, which is a list of maximum size of 5 and each element of showing the name, popularity rank and display picture in a PopularContactCard.
The way these UI elements are added is shown in the following diagram (Refer to Figure 27) :
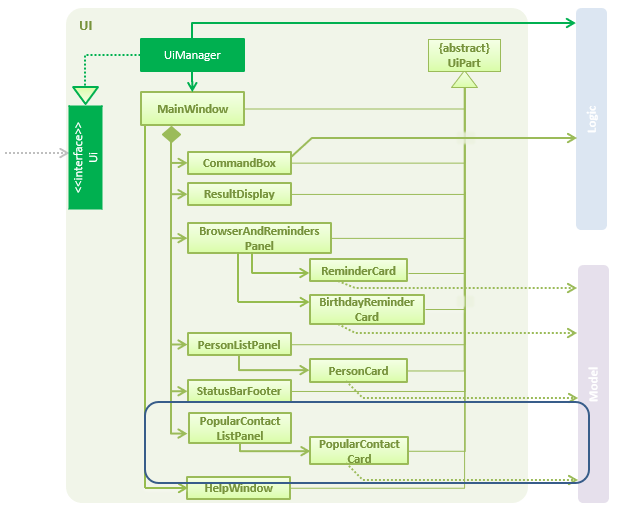
Figure 27 : Class Diagram of UI with Popular Contact Panel.
The mechanism to show the top five most frequently visited contacts is facilitated by the PopularityCounter of each contact.
For every new person added into the address book, he is assigned a popularity counter of 0. The top five popular contacts are extracted by sorting the list based on the field PopularityCounter of each person. In the case of two or more people having the same popularity counter, the person who was added earlier into iContacts is given higher priority.
This feature is not implemented as a command.The list gets refreshed whenever the PopularityCounter is supposed to change.
|
The Frequently Visited Contacts mechanism is an event-driven mechanism. However, there is no explicit command to view the top five frequently visited contacts as they are always refreshed whenever there is an change in the address book. They are always displayed on the UI below the CommandResult panel.
The event to refresh the PopularContactList, PopularContactChangedEvent is triggered whenever any of the command that increases PopularityCounter is executed.
The event triggers the following method:
public void updatePopularContactList() {
        refreshWithPopulatingAddressBook();
        listOfPersonsForPopularContacts.sort((o1, o2) ->
                o2.getPopularityCounter().getCounter() - o1.getPopularityCounter().getCounter());

        getOnlyTopFiveMaximum();
    }
The following are the commands which will increase the PopularityCounter by one for the contacts viewed or searched:
-
viewtag -
select -
details[special case when counter increases by 2 as it is a stronger indicator of who could be a frequently visited contact] -
location -
email
On execution of any of the following command, an extra event is raised which updates the PopularContactList after updating the popularity counter of the contact.
The sequence diagram for the extra event is shown below for select command (Refer to Figure 28):
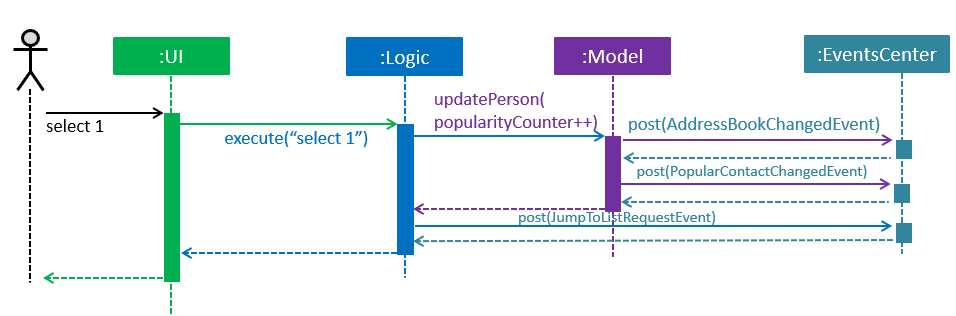
Figure 28 : Sequence diagram for frequently visited mechanism for select command.
Manual selection of person through a click also increases the popularity counter of that person. This is the same action as the details command.
|
The following method is used to increase the PopularityCounter by one:
public ReadOnlyPerson increaseCounterByOne(ReadOnlyPerson person) {
        person.getPopularityCounter().increasePopularityCounter();

        return new Person(person.getName(), person.getPhone(), person.getEmail(), person.getAddress(),
                person.getBirthday(), person.getNickname(), person.getDisplayPicture(), person.getPopularityCounter(),
                person.getTags());
    }
The sequence diagram below shows how the event is triggered and how the saving of updated address book takes place (Refer to Figure 29):
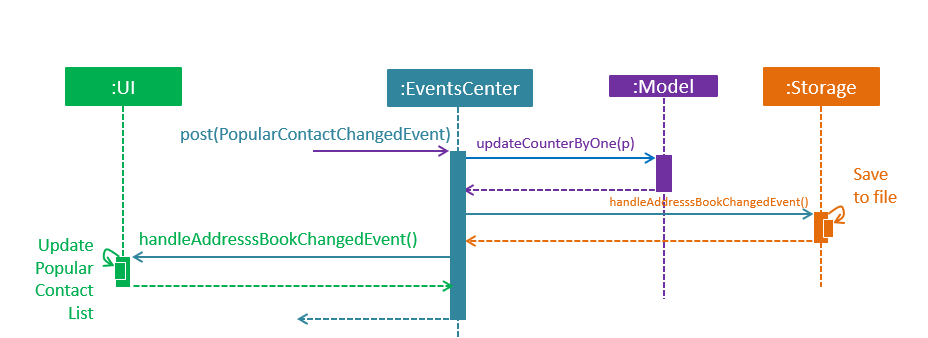
Figure 29 : Sequence diagram for frequently visited mechanism.
Design Considerations
Aspect: How to implement the feature
Alternative 1 (current choice): Refresh the list every time one of the command that changes the Popularity is executed
Pros: Becomes a dynamic feature such that user can see favourite contacts at any time
Cons: Makes application slightly slower as more execution of code for those commands
Alternative 2: Execute command to refresh list of popular contacts
Pros: Reduces regular refresh of list
Cons: Will have to keep track of command history to see the list of commands executed before previous execution of favourites command
4.11. Details Panel Implementation
The details command shows more details of the contact like address, birthday, email in addition to the details shown in the PersonCard of PersonListPanel
The DetailsPanel is an Anchor Pane which is embedded inside BrowserAndReminderPanel.
At any point of time, only one of the three panels (Browser, Reminder, Details) inside BrowserAndReminderPanel will have the visibility set as true and in front of the other two panels.
|
The UML diagram below represents the UI structure for the BrowserAndReminderPanel (Refer to Figure 30):
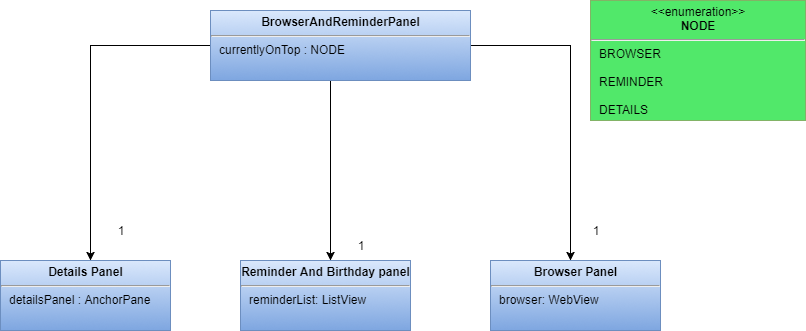
Figure 30 : UML Diagram for Panel.
The code to ensure only DetailsPanel is displayed on execution of command is shown below:
private void setUpToShowDetailsPanel() {
        detailsPanel.setVisible(true);
        remindersPanel.setVisible(false);
        browser.setVisible(false);
}
The DetailsPanel is also displayed when the user manually clicks on the PersonCard. This is made possible by raising the SelectionChangedEvent to show the DetailsPanel.
The selectionModel() of PersonListView is now linked to the details command rather than the select command.
The select command now only scrolls to the INDEX specified whereas details command scrolls to and selects the person to show his/her details in the panel.
|
The figure below (Refer to figure 31) is the wireframe for the DetailsPanel:
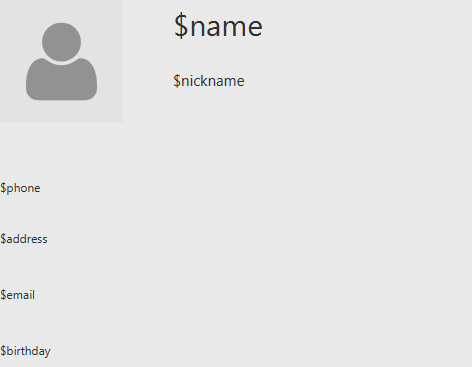
Figure 31 : Wireframe for Details Panel.
Using the FontAwesomeFx library, an icon is set for each label to make the UI look appealing as seen in the UI above (Refer to figure TBD).
The solution to show the same colour for a tag in DetailsPanel and PersonCard was resolved by having a Singleton Class TagColor.
The following code inside the class ensured that the class acts as an global class and since only one instance is created, it made the tag color’s constant.
public static TagColor getInstance() {
        if (tagColor == null) {
            tagColor = new TagColor();
        }
        return tagColor;
    }
Design Consideration
Aspect: How to improve UI
Alternative 1 (current choice): Show the extra details of contact after they are selected.
Pros: Allows more contacts to be shown in the list as the information is reduced.
Cons: User needs to manually select the user to see more details of that person.
Alternative 2: Show all detail of person in the PersonCard.
Pros: Reduces effort of selection of contact to see extra details.
Cons: Looks very cluttered and has poor User Interface design.
4.12. View tag mechanism
The command is added into the Logic component according to following class diagram (Refer to Figure 32):
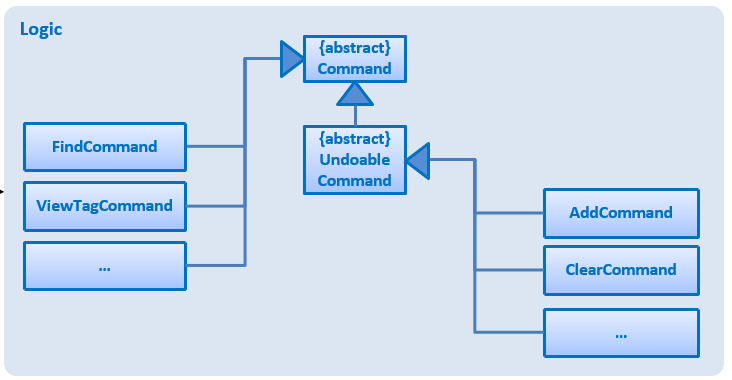
Figure 32 : Class Diagram of Logic.
The viewtag command works by setting the predicate to the Observable filteredlist.
Only one keyword is allowed for the command and it shows all people with the given tag.
The method test(ReadOnlyPerson person) iterates through the tagKeywords to find a match of every person from the address book.
Streams and lambda (Java 8 features) are used to make the code more readable as shown below:
public boolean test(ReadOnlyPerson person) {
        Set<Tag> tagsOfPerson = person.getTags();

        return tagsOfPerson.stream()
                .anyMatch(tagMatches -> tagMatches.getTagName().equalsIgnoreCase(keyword));

    }
Design Consideration
Aspect: How to filter the list
Alternative 1 (current choice): Use of Lambda and Stream.
Pros: The code is more readable.
Cons: It sometimes takes more time to process than normal loops.
Alternative 2: Loops and Conditions.
Pros: It is known to be faster than Streams at times.
Cons: It is harder to avoid arrow-headed violation of coding style.
4.13. Toggling mechanism
The toggling mechanism is an event-driven mechanism.
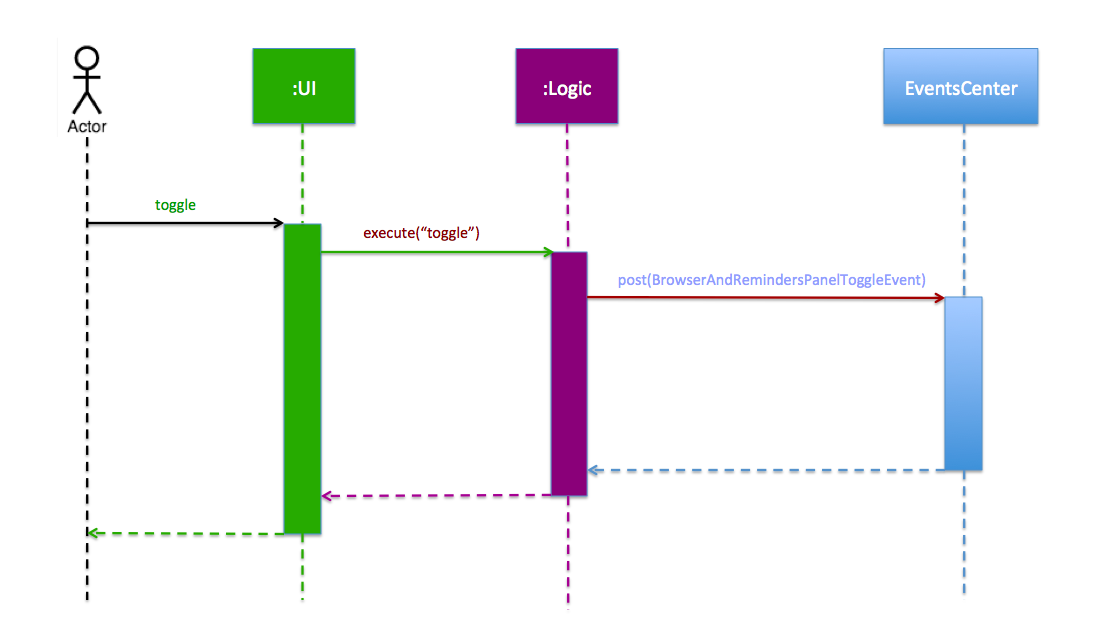
Figure 33 : Component interactions for the toggling mechanism.
The above diagram (Refer to Figure 33) shows the high-level overview of the component interactions for the toggling mechanism.
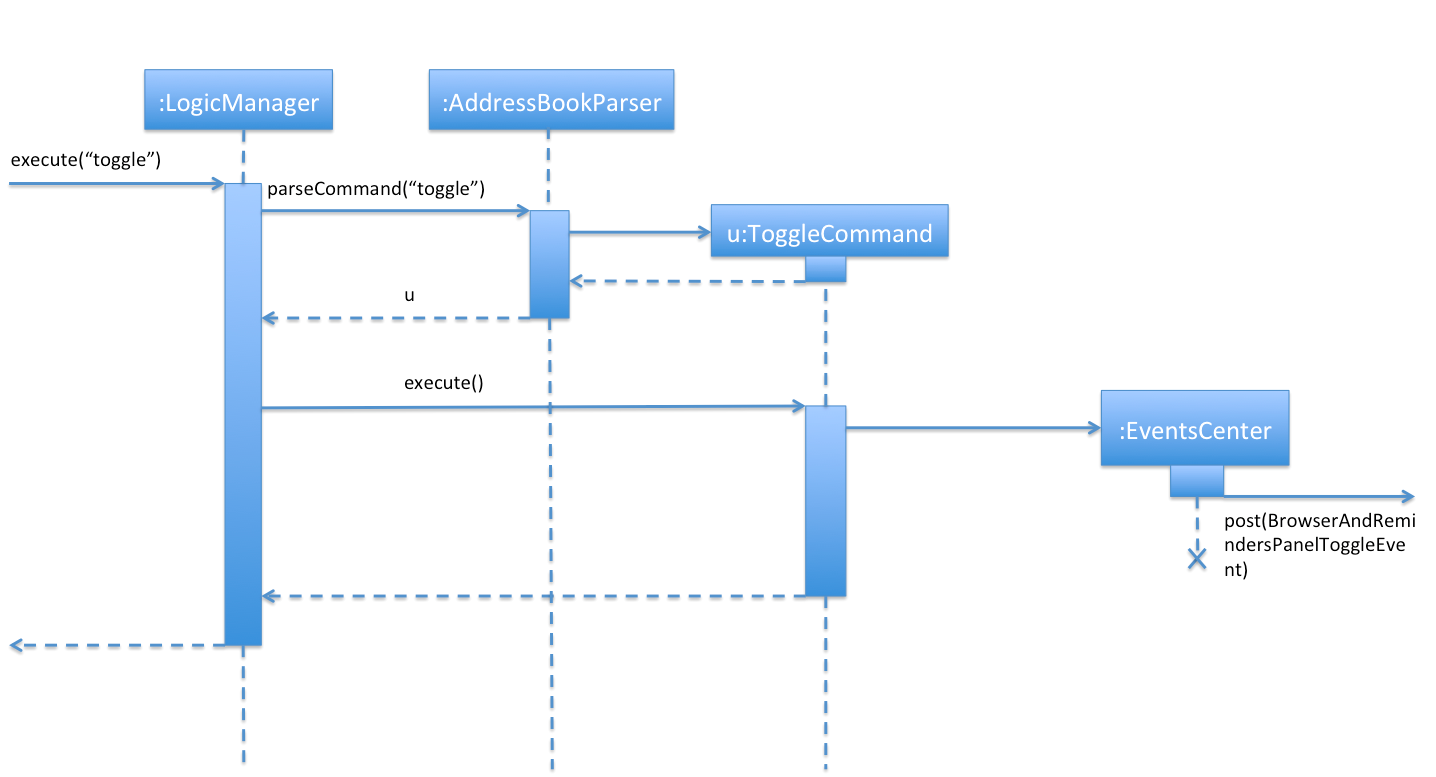
Figure 34 : Sequence diagram for the first part of the toggling mechanism.
As seen from the sequence diagram above (Refer to Figure 34), when the user types the command for toggle, an instance of ToggleCommand would be created.
Upon execution by LogicManager, the event BrowserAndRemindersPanelToggleEvent would be posted by the EventCenter to the EventBus:
public class ToggleCommand extends Command {
    @Override
    public CommandResult execute() {
        EventsCenter.getInstance().post(new BrowserAndRemindersPanelToggleEvent());
        // ... return some object or null ...
    }
}
As seen from the diagram below (Refer to Figure 35), the method handleBrowserToggleEvent() in the BrowserAndRemindersPanel class in the UI component will then listen for the event,
and upon receiving the event it will invoke the method toggleBrowserPanel to trigger the actual toggling.
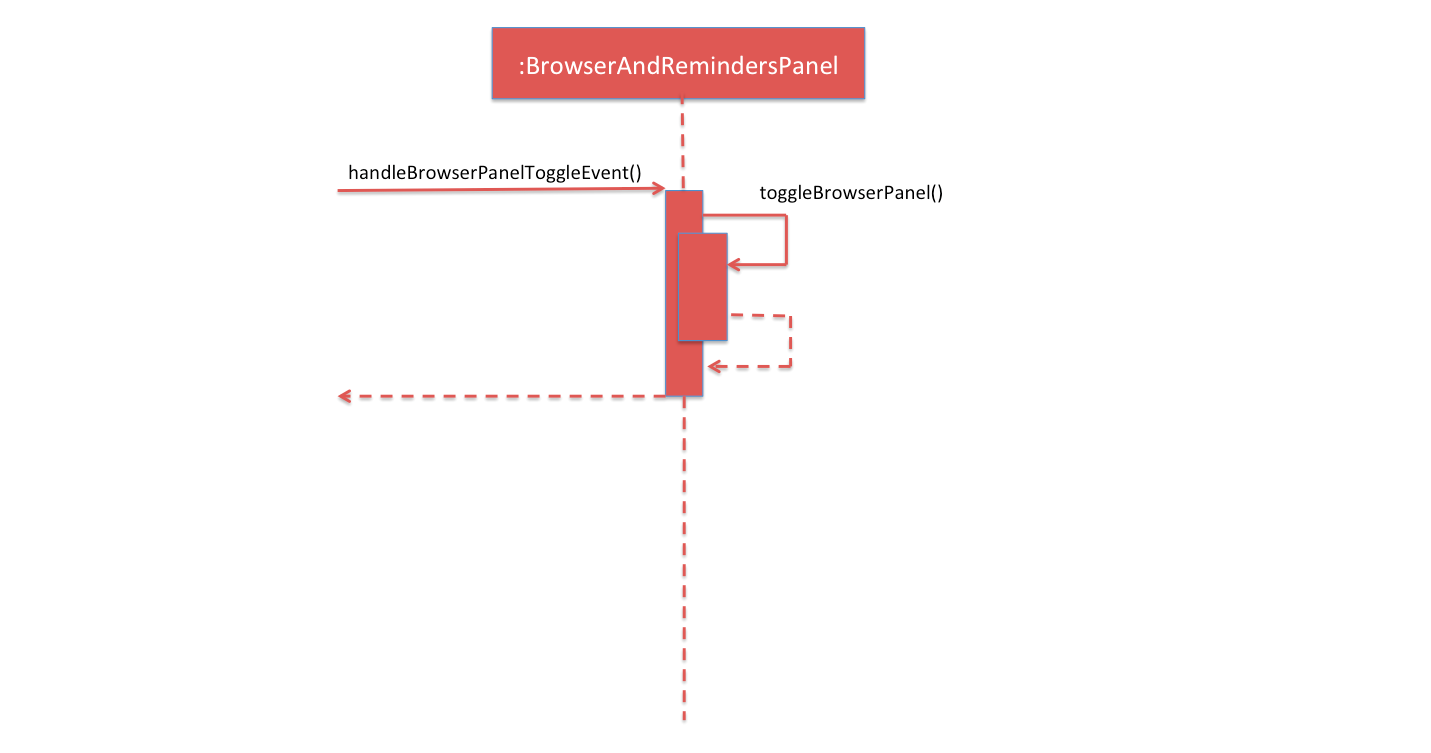
Figure 35 : Sequence diagram for the second part of the toggling mechanism.
The BrowserAndRemindersPanel class has a variable currentlyInFront keeping track of which panel (browser or reminders) is currently being shown.
toggleBrowserPanel would then use the currentlyInFront variable to toggle to and show the correct panel, and then update currentlyInFront appropriately:
public class BrowserAndRemindersPanel extends UIPart<Region> {
    @Subscribe
    private void handleBrowserPanelToggleEvent(BrowserAndRemindersPanelToggleEvent event) {
        logger.info(LogsCenter.getEventHandlingLogMessage(event));
        toggleBrowserPanel();
    }

    private void toggleBrowserPanel() {
        switch(currentlyInFront) {
        case BROWSER:
            setUpToShowRemindersPanel();
            remindersPanel.toFront();
            currentlyInFront = Node.REMINDERS;
            break;
        case REMINDERS:
            setUpToShowWebBrowser();
            browser.toFront();
            currentlyInFront = Node.BROWSER;
            break;


        //... Other cases ...

        }
    }
}
One important thing to note is that when the select command is executed, the browser panel would be brought forward no matter what:
public class BrowserAndRemindersPanel extends UIPart<Region> {
    @Subscribe
    private void handleLoadPersonPageEvent(LoadPersonWebpageEvent event) {
        setUpToShowWebBrowser();
        currentlyInFront = Node.BROWSER;
        browser.toFront();
        loadPersonPage(event.getPerson());
    }

    private void setUpToShowWebBrowser() {
        browser.setVisible(true);
        detailsPanel.setVisible(false);
        remindersPanel.setVisible(false);
     }
}
The LoadPersonWebpageEvent is posted whenever the select command is executed. Within the handleLoadPersonPageEvent
method, the statement browser.toFront() and the method setUpToShowWebBrowser would then bring the browser panel to the front no matter what, and also make it visible.
Design Considerations
Aspect: Usage of browser area
Alternative 1 (current choice): Allow users to toggle between the browser and reminders panel.
Pros: Can use the entire space for either the browser or reminders panel.
Cons: Users need to manually switch between the browser and reminders panel.
Alternative 2: Put reminders and browser panels side-by-side.
Pros: Users do not need to manually switch between the browser and reminders panel.
Cons: Too little space for browser and reminders, making it difficult to read for the users.
Aspect: Implementation of toggling mechanism.
Alternative 1 (current choice): Bring browser and reminders panel to the front as required, on top of setting their visibility suitably.
Pros: Users can interact with both browser and reminders (can scroll through reminders etc).
Cons: More difficult to implement.
Alternative 2: Only set visibility of browser and reminders panel as required (set browser visibility to false to display reminders and vice versa).
Pros: Easier to implement.
Cons: Users cannot interact with the reminders panel (since the browser is technically still at the front).
4.14. Reminder Implementation
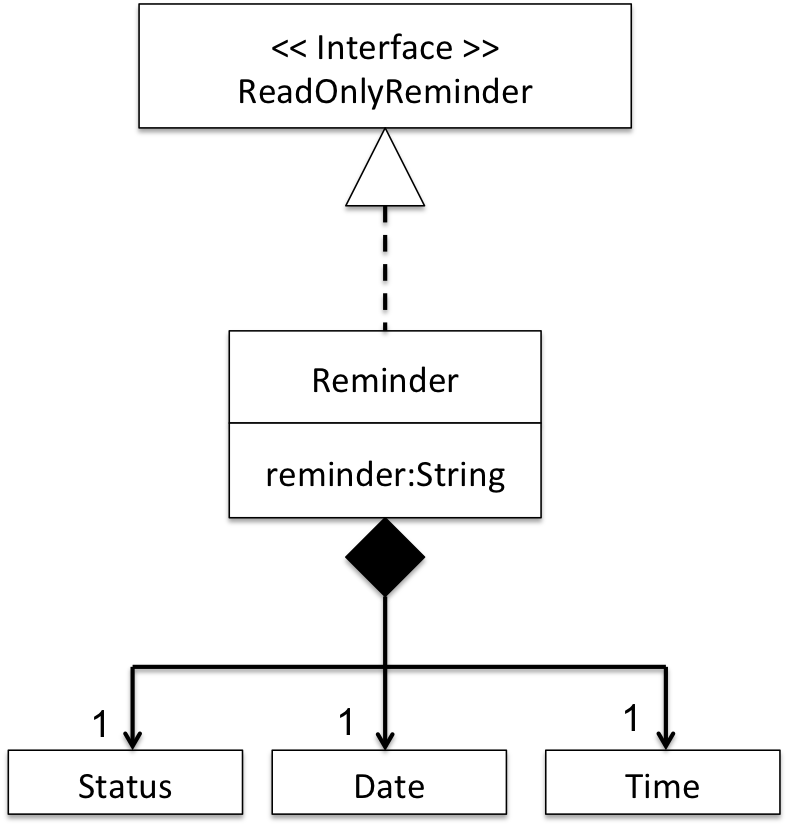
Figure 36: UML class diagram showing the make-up of Reminder objects.
The Reminder object represents a reminder in iContacts. It contains a String variable reminder, which represents
the actual reminder from the user, and also a Date, Time and Status object, which represents the date, time and status of the reminder respectively
(Refer to Figure 36). As part of defensive programming, Reminder implements the ReadOnlyReminder interface, which only allows read operations, thus
helping to prevent inappropriate or unintended modifications to Reminder objects (Refer to Figure 36) during the execution of the program.
For example, for DeleteReminderCommand, its execute method should only execute the deletion of a specified reminder, not to alter any reminders.
To ensure that no unintended or inappropriate alteration happens, DeleteReminderCommand is passed a list of ReadOnlyReminder instead of Reminder. This can
be seen from the code snippet below:
public class DeleteReminderCommand extends Command {
    @Override
    public CommandResult execute() throws CommandException {
        List<ReadOnlyReminder> reminderListing = model.getSortedReminderList();

        if (targetIndex.getZeroBased() >= reminderListing.size()) {
            throw new CommandException(Messages.MESSAGE_INVALID_REMINDER_DISPLAYED_INDEX);
        }

        ReadOnlyReminder reminderToDelete = reminderListing.get(targetIndex.getZeroBased());

        try {
            model.deleteReminder(reminderToDelete);
        } catch (ReminderNotFoundException rnfe) {
            assert false : "The target reminder cannot be missing";
        }

        ... //return from method ...
    }
}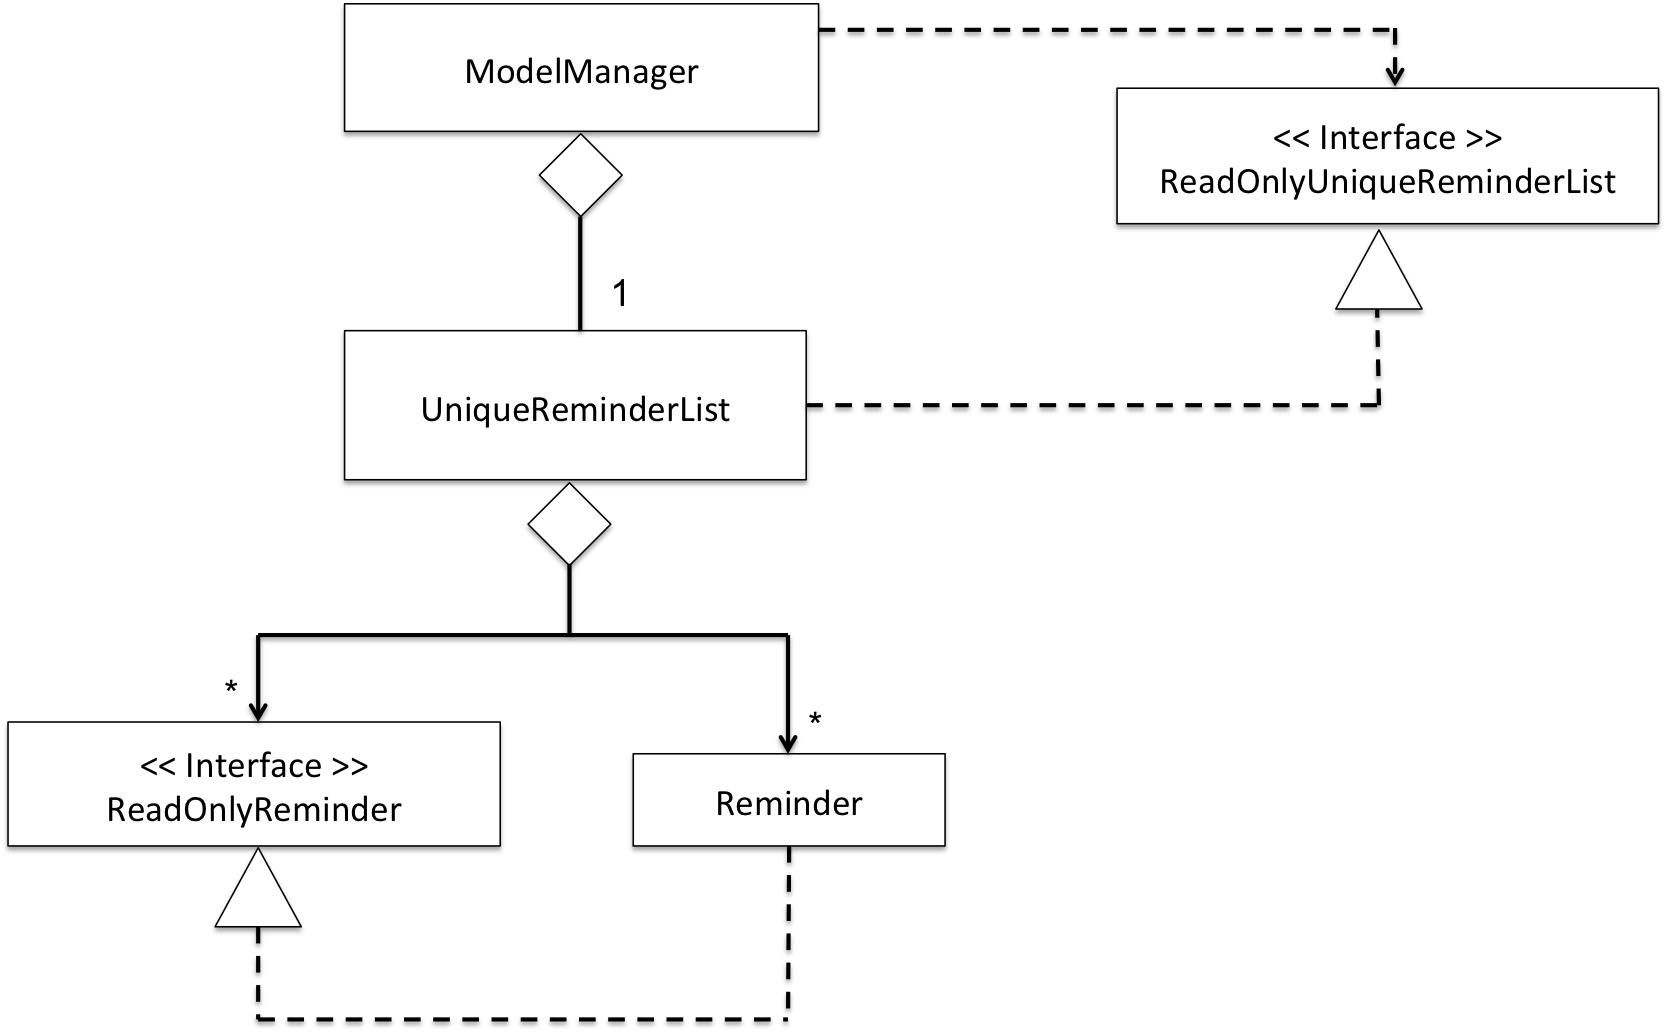
Figure 37: In-memory implementation of Reminder.
In terms of how Reminder objects are kept in-memory during the execution of the program, Reminder objects are
kept within UniqueReminderList (Refer to Figure 37), which assures that there are no duplicate Reminder objects. The UniqueReminderList
object is then kept and used by ModelManager to carry out commands related to reminders while the program is running.
Similar to Reminder, as can be seen from Figure 37 above, UniqueReminderList implements the ReadOnlyUniqueReminderList interface to prevent
inappropriate or unintended modifications to UniqueReminderList during the execution of the program.
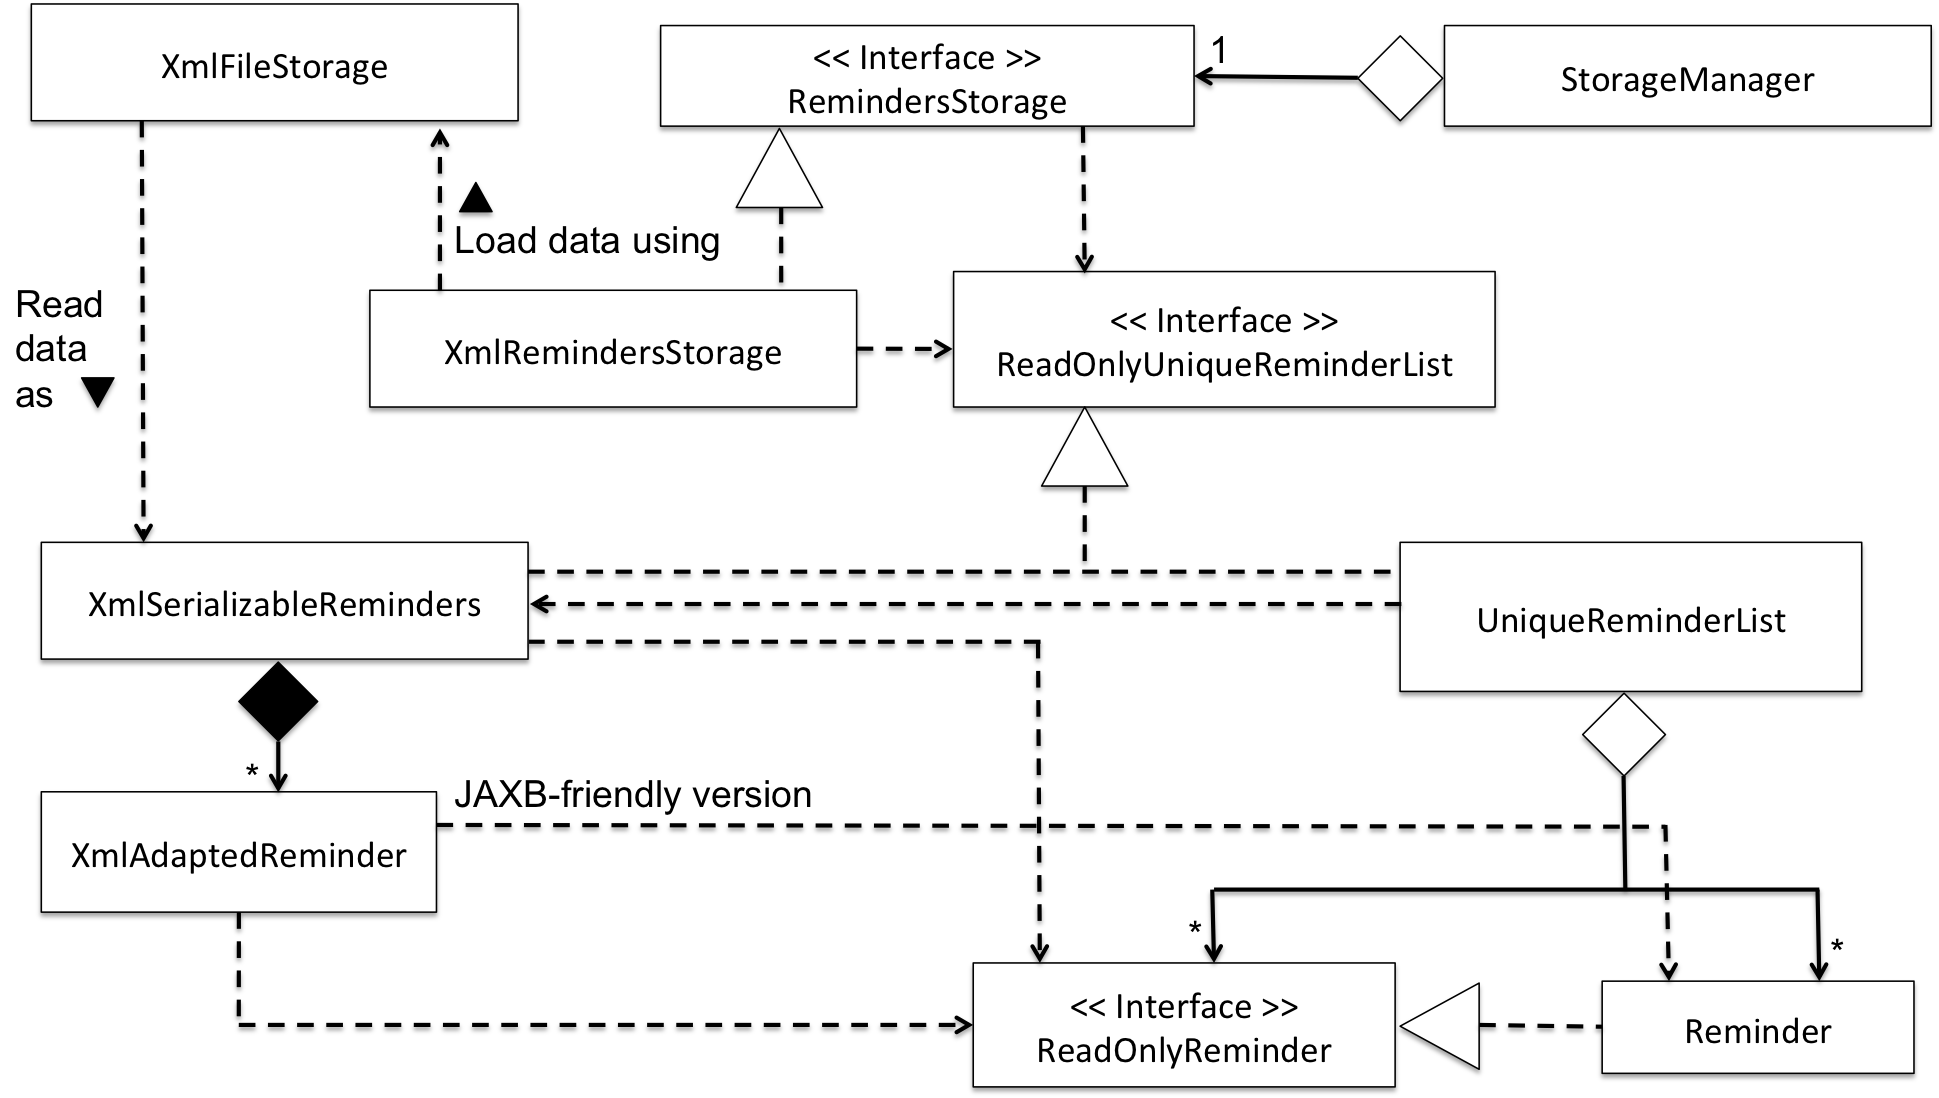
Figure 38: How Reminder is stored.
As seen from Figure 38, Reminder objects are stored in a XML storage file in a JAXB-friendly version XmlAdaptedReminder. Notably, the Status object is not stored along with
the Reminder object; it is instantiated and initialized with an appropriate value during runtime when the Reminder object is instantiated.
When the program starts, XmlAdaptedReminder objects are read in as XmlSerializableReminders via XmlFileStorage and XmlUtil.
This can be seen below:
public class XmlFileStorage {

    public static XmlSerializableReminders loadRemindersFromSaveFile(File file) throws DataConversionException, FileNotFoundException {
        try{
            return XmlUtil.getDataFromFile(file, XmlSerializableReminders.class);
        } catch (JAXBException e) {
            throw new DataConversionException(e);
        }
    )

}
The XmlSerializableReminders object is then passed to UniqueReminderList, which then converts it into a list of Reminder objects for in-memory use.
This can be seen below:
public class UniqueReminderList implements Iterable<Reminder>, ReadOnlyUniqueReminderList {
    public UniqueReminderList(ReadOnlyUniqueReminderList xmlReminders) {
        requireNonNull(xmlReminders);
        try {
            setReminders(xmlReminders.toModelType());
        } catch (DuplicateReminderException dre) {
            assert false : "Reminders from storage should not have duplicates";
        }
    }

    public void setReminders(List<ReadOnlyReminder> reminders) throws DuplicateReminderException {
        final UniqueReminderList replacement = new UniqueReminderList();
        for (final ReadOnlyReminder reminder : reminders) {
            replacement.add(new Reminder(reminder));
        }
        setReminders(replacement);
    }

    public void setReminders(UniqueReminderList replacement) {
        this.internalList.setAll(replacement.internalList);
    }
}
As can be seen from the code snippet above and in Figure 38, as part of defensive programming, XmlSerializableReminders also implements the ReadOnlyUniqueReminderList interface.
To save, the saveReminders method in StorageManager is invoked:
    @Override
    public void saveReminders(ReadOnlyUniqueReminderList reminderList) throws IOException {
        saveReminders(reminderList, remindersStorage.getRemindersFilePath());
    }

    @Override
    public void saveReminders(ReadOnlyUniqueReminderList reminderList, String filePath) throws IOException {
        logger.fine("Attempting to write to data file: " + filePath);
        remindersStorage.saveReminders(reminderList, filePath);
    }
This will then invoke the saveReminders method in XmlRemindersStorage, and go on to invoke the saveRemindersToFile method in XmlFileStorage,
and finally the saveDataToFile method in XmlUtil.
The color of the reminder cells are decided and set during the formation of ReminderListViewCell. This can be seen from the
code snippet below:
public class BirthdayAndReminderListPanel extends UiPart<Region> {

    class ReminderListViewCell extends ListCell<ReminderCard> {

        @Override
        protected void updateItem(ReminderCard reminder, boolean empty) {
            super.updateItem(reminder, empty);

            if (empty || reminder == null) {
                setGraphic(null);
                setText(null);
                return;
            }
            this.getStylesheets().clear();
            if (reminder.isEventToday()) {
                this.getStylesheets().add(REMINDER_TODAY_STYLE_SHEET);
            } else if (reminder.isEventWithinThreeDays()) {
                this.getStylesheets().add(REMINDER_THREE_DAYS_STYLE_SHEET);
            } else if (!reminder.hasEventPassed()) {
                this.getStylesheets().add(REMINDER_NORMAL_STYLE_SHEET);
            }

            setGraphic(reminder.getRoot());
        }
    }

}
Depending on the status of the reminder, different styles would be set for the specific ReminderListViewCell.
The methods isEventToday, isEventWithinThreeDays and hasEventPassed seen from the code snippet above originate from
the Status object of each Reminder object and propagated from Status to Reminder then finally to ReminderCard.
Design Consideration
Aspect: How to store Reminder in-memory
Alternative 1 (current choice): Store Reminder objects in UniqueReminderList, independent of AddressBook.
Pros: Follows the Single-Responsibility Principle, because a reminder should not be an address book’s responsibility.
Cons: More changes have to be made to the existing code base, making it tougher to implement.
Alternative 2: Store Reminder objects within AddressBook.
Pros: Easier to implement as lesser changes have to be made to the existing code base.
Cons: Violates the Single-Responsibility Principle.
Aspect: Should the undo/redo mechanism be applied to Reminder
Alternative 1 (current choice): Commands that affect Reminder objects are not undoable/redoable.
Pros: Users would be more aware of any changes they made to a reminder, as they are forced to
use the editreminder, addreminder and deletereminder commands.
Cons: It is less user-friendly.
Alternative 2: Commands that affect Reminder objects are undoable/redoable.
Pros: More user-friendly.
Cons: Users might get careless with changing the information of a Reminder object. This might be detrimental
as the date and time fields of a Reminder are very important.
4.15. Theme-changing mechanism

Figure 39 : Component interactions for the theme-changing mechanism
The theme-changing mechanism is an event-driven mechanism. The above diagram (Refer to Figure 39) shows the high-level overview of the component interactions for the theme-changing mechanism.
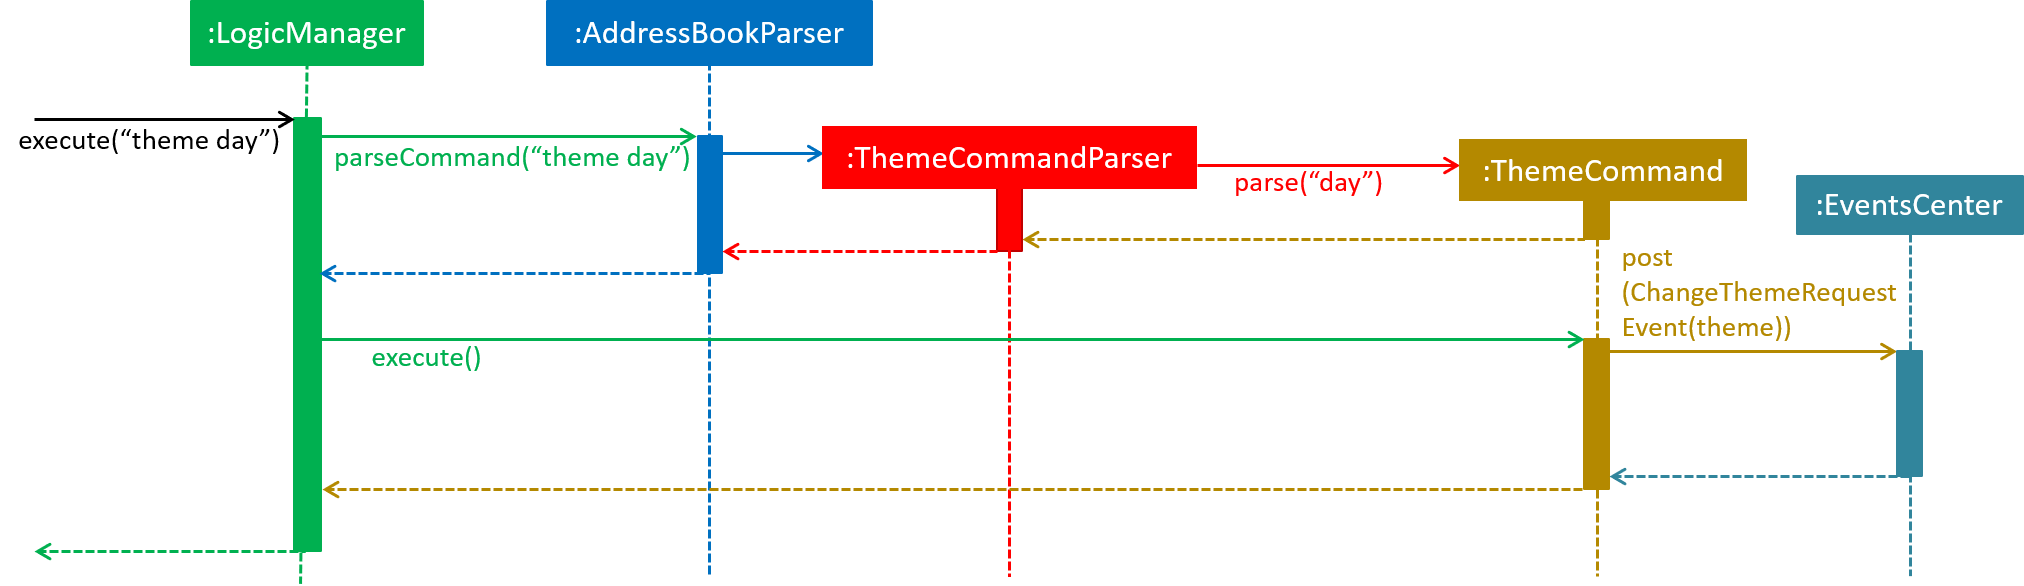
Figure 40 : Sequence diagram for the first part of the theme-changing mechanism
As shown from the sequence diagram above (Refer to Figure 40), after the user entered the command theme day, a new object ThemeCommand will be created. The LogicManager will then execute ThemeCommand, and the event ChangeThemeRequestEvent will be posted by EventsCenter. The code snippet below shows the execute() method of ThemeCommand:
public class ThemeCommand extends Command {
    @Override
    public CommandResult execute() {
        EventsCenter.getInstance().post(new ChangeThemeRequestEvent(theme));
        return new CommandResult(String.format(MESSAGE_SET_THEME_SUCCESS, theme.getTheme()));
    }
}
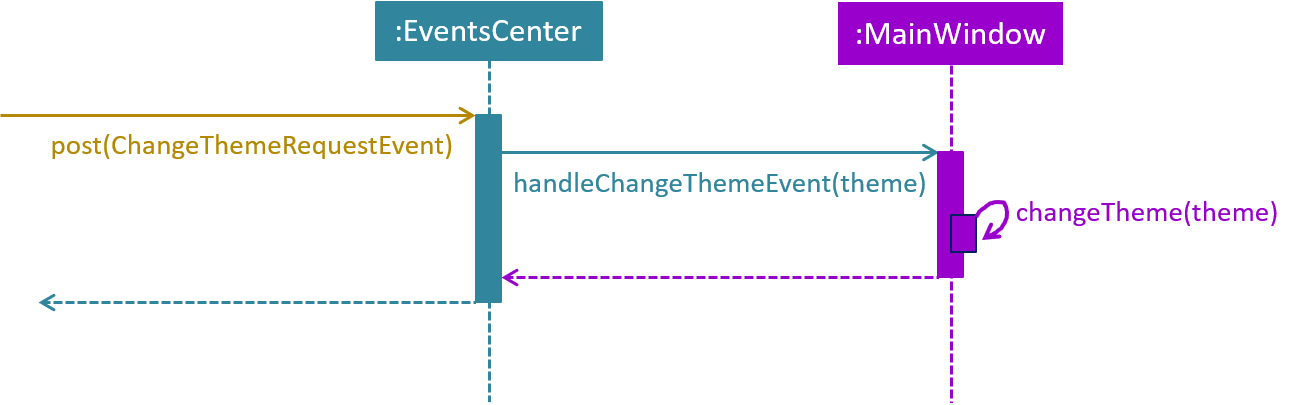
Figure 41 : Sequence diagram for the second part of the theme-changing mechanism
As shown from the sequence diagram above (Refer to Figure 41), the method handleChangeThemeEvent() in MainWindow will handle the event and change the theme of the address book through the method changeTheme() accordingly.
Design Considerations
Aspect: Implementation of ThemeCommand
Alternative 1 (current choice): Utilize ChangeEventRequestEvent that allow MainWindow to handle the event to change the theme.
Pros: ThemeCommand can be more efficient since it does not directly change the theme.
Cons: New developers may find it difficult to understand the event-driven nature of the application.
Alternative 2: Allow ThemeCommand to set the theme directly by allowing it access to MainWindow.
Pros: Easier for new developers to understand.
Cons: Violates the architectural style as ThemeCommand belongs to the Logic component that should not be able to access the UI component where MainWindow belongs to.
4.16. Logging
We are using java.util.logging package for logging. The LogsCenter class is used to manage the logging levels and logging destinations.
-
The logging level can be controlled using the
logLevelsetting in the configuration file (See Configuration). -
The
Loggerfor a class can be obtained usingLogsCenter.getLogger(Class)which will log messages according to the specified logging level. -
Currently log messages are output through:
Consoleand to a.logfile.
Logging Levels
The list below shows all the available logging levels used:
-
SEVERE: Critical problem detected which may possibly cause the termination of the application. -
WARNING: Can continue, but with caution. -
INFO: Information showing the noteworthy actions by the App. -
FINE: Details that is not usually noteworthy but may be useful in debugging e.g. print the actual list instead of just its size.
4.17. Configuration
Certain properties of the application can be controlled (e.g App name, logging level) through the configuration file (default: config.json).
5. Documentation
We use asciidoc for writing documentation.
| We chose asciidoc over Markdown because asciidoc, although a bit more complex than Markdown, provides more flexibility in formatting. |
5.1. Editing Documentation
See UsingGradle.adoc to learn how to render .adoc files locally to preview the end result of your edits.
Alternatively, you can download the AsciiDoc plugin for IntelliJ, which allows you to preview the changes you have made to your .adoc files in real-time.
5.2. Publishing Documentation
See UsingTravis.adoc to learn how to deploy GitHub Pages using Travis.
5.3. Converting Documentation to PDF format
We use Google Chrome for converting documentation to PDF format, as Chrome’s PDF engine preserves hyperlinks used in webpages.
Here are the steps to convert the project documentation files to PDF format.
-
Follow the instructions in UsingGradle.adoc to convert the AsciiDoc files in the
docs/directory to HTML format. -
Go to your generated HTML files in the
build/docsfolder, right click on them and selectOpen with→Google Chrome. -
Within Chrome, click on the
Printoption in Chrome’s menu. -
Set the destination to
Save as PDF, then clickSaveto save a copy of the file in PDF format. For best results, use the settings indicated in the screenshot below (Refer to Figure 42).
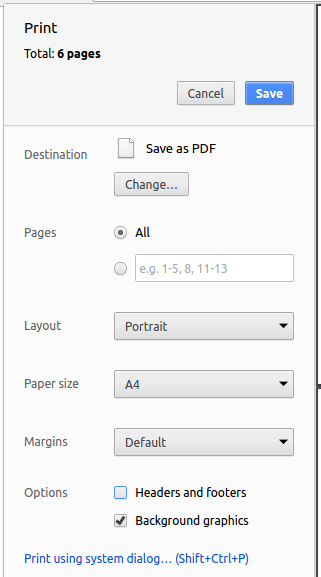
Figure 42 : Saving documentation as PDF files in Chrome
6. Testing
6.1. Running Tests
There are three ways to run tests:
| The most reliable way to run tests is the 3rd one. The first two methods might fail some GUI tests due to platform/resolution-specific idiosyncrasies. |
Method 1: Using IntelliJ JUnit test runner
-
To run all tests, right-click on the
src/test/javafolder and chooseRun 'All Tests'. -
To run a subset of tests, you can right-click on a test package, test class, or a test and choose
Run 'ABC'.
Method 2: Using Gradle
-
Open a console and run the command
gradlew clean allTests(Mac/Linux:./gradlew clean allTests).
| See UsingGradle.adoc for more info on how to run tests using Gradle. |
Method 3: Using Gradle (headless)
Thanks to the TestFX library we use, our GUI tests can be run in the headless mode. In the headless mode, GUI tests do not show up on the screen. That means the developer can do other things on the Computer while the tests are running.
To run tests in headless mode, open a console and run the command gradlew clean headless allTests (Mac/Linux: ./gradlew clean headless allTests).
6.2. Types of tests
We have two types of tests:
-
GUI Tests - These are tests involving the GUI. They include
-
System Tests that test the entire App by simulating user actions on the GUI. These are in the
systemtestspackage. -
Unit tests that test the individual components. These are in
seedu.address.uipackage.
-
-
Non-GUI Tests - These are tests not involving the GUI. They include
-
Unit tests targeting the lowest level methods/classes.
e.g.seedu.address.commons.StringUtilTest -
Integration tests that are checking the integration of multiple code units (those code units are assumed to be working).
e.g.seedu.address.storage.StorageManagerTest -
Hybrids of unit and integration tests. These tests are checking multiple code units as well as how they are connected together.
e.g.seedu.address.logic.LogicManagerTest
-
6.3. Troubleshooting Testing
Problem: HelpWindowTest fails with a NullPointerException.
-
Reason: One of its dependencies,
UserGuide.htmlinsrc/main/resources/docsis missing. -
Solution: Execute Gradle task
processResources.
7. Dev Ops
7.1. Build Automation
See UsingGradle.adoc to learn how to use Gradle for build automation.
7.2. Continuous Integration
We use Travis CI and AppVeyor to perform Continuous Integration on our projects. See UsingTravis.adoc and UsingAppVeyor.adoc for more details.
7.3. Making a Release
Here are the steps to create a new release:
-
Update the version number in
MainApp.java. -
Generate a JAR file using Gradle.
-
Tag the repo with the version number. e.g.
v0.1 -
Create a new release using GitHub and upload the JAR file you created.
7.4. Managing Dependencies
A project often depends on third-party libraries. For example, iContacts depends on the Jackson library for XML parsing. Managing these dependencies can be automated using Gradle. For example, Gradle can download the dependencies automatically, which is better than these alternatives:
-
Include those libraries in the repo (this bloats the repo size).
-
Require developers to download those libraries manually (this creates extra work for developers).
Appendix A: Suggested Programming Tasks to Get Started
Suggested path for new programmers:
-
First, add small local-impact (i.e. the impact of the change does not go beyond the component) enhancements to one component at a time. Some suggestions are given in this section Improving a Component.
-
Next, add a feature that touches multiple components to learn how to implement an end-to-end feature across all components. The section Creating a new command:
remarkexplains how to go about adding such a feature.
A.1. Improving each component
Each individual exercise in this section is component-based (i.e. you would not need to modify the other components to get it to work).
Logic component
Do take a look at the Design: Logic Component section before attempting to modify the Logic component.
|
-
Add a shorthand equivalent alias for each of the individual commands. For example, besides typing
clear, the user can also typecto remove all persons in the list.
Model component
Do take a look at the Design: Model Component section before attempting to modify the Model component.
|
-
Add a
removeTag(Tag)method. The specified tag will be removed from everyone in the address book.
Ui component
Do take a look at the Design: UI Component section before attempting to modify the UI component.
|
-
Use different colors for different tags inside person cards. For example,
friendstags can be all in grey, andcolleaguestags can be all in red (Refer to Figures 43 and 44).Before
Figure 43: Before applying colors to tags.
After
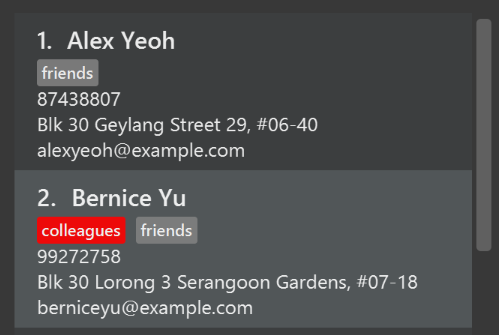
Figure 44: After applying colors to tags.
-
Modify
NewResultAvailableEventsuch thatResultDisplaycan show a different style on error (currently it shows the same regardless of errors) (Refer to Figures 45 and 46).Before
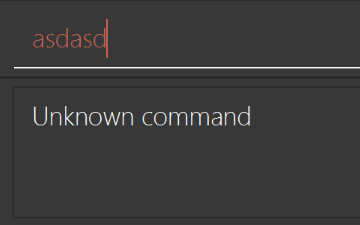
Figure 45: Style before modification.
After
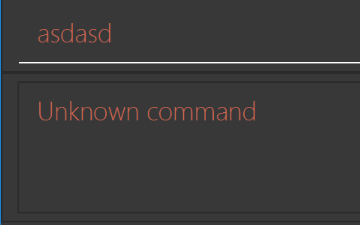
Figure 46: Style after modification.
-
Modify the
StatusBarFooterto show the total number of people in the address book (Refer to Figures 47 and 48).Before

Figure 47: No values showed before modification.
After

Figure 48: Number of persons showed after modification.
Storage component
Do take a look at the Design: Storage Component section before attempting to modify the Storage component.
|
-
Add a new method
backupAddressBook(ReadOnlyAddressBook), so that the address book can be saved in a fixed temporary location.
A.2. Creating a new command: remark
By creating this command, you will get a chance to learn how to implement a feature end-to-end, touching all major components of the app.
A.2.1. Description
Edits the remark for a person specified in the INDEX.
Format: remark INDEX r/[REMARK]
Examples:
-
remark 1 r/Likes to drink coffee.
Edits the remark for the first person toLikes to drink coffee. -
remark 1 r/
Removes the remark for the first person.
A.2.2. Step-by-step Instructions
[Step 1] Logic: Teach the app to accept 'remark' which does nothing
Let’s start by teaching the application how to parse a remark command. We will add the logic of remark later.
Main:
-
Add a
RemarkCommandthat extendsUndoableCommand. Upon execution, it should just throw anException. -
Modify
AddressBookParserto accept aRemarkCommand.
Tests:
-
Add
RemarkCommandTestthat tests thatexecuteUndoableCommand()throws an Exception. -
Add new test method to
AddressBookParserTest, which tests that typing "remark" returns an instance ofRemarkCommand.
[Step 2] Logic: Teach the app to accept 'remark' arguments
Let’s teach the application to parse arguments that our remark command will accept. E.g. 1 r/Likes to drink coffee.
Main:
-
Modify
RemarkCommandto take in anIndexandStringand print those two parameters as the error message. -
Add
RemarkCommandParserthat knows how to parse two arguments, one index and one with prefix 'r/'. -
Modify
AddressBookParserto use the newly implementedRemarkCommandParser.
Tests:
-
Modify
RemarkCommandTestto test theRemarkCommand#equals()method. -
Add
RemarkCommandParserTestthat tests different boundary values forRemarkCommandParser. -
Modify
AddressBookParserTestto test that the correct command is generated according to the user input.
[Step 3] Ui: Add a placeholder for remark in PersonCard
Let’s add a placeholder on all our PersonCard s to display a remark for each person later.
Main:
-
Add a
Labelwith any random text insidePersonListCard.fxml. -
Add FXML annotation in
PersonCardto tie the variable to the actual label.
Tests:
-
Modify
PersonCardHandleso that future tests can read the contents of the remark label.
[Step 4] Model: Add Remark class
We have to properly encapsulate the remark in our ReadOnlyPerson class. Instead of just using a String, let’s follow the conventional class structure that the codebase already uses by adding a Remark class.
Main:
-
Add
Remarkto model component (you can copy fromAddress, remove the regex and change the names accordingly). -
Modify
RemarkCommandto now take in aRemarkinstead of aString.
Tests:
-
Add test for
Remark, to test theRemark#equals()method.
[Step 5] Model: Modify ReadOnlyPerson to support a Remark field
Now we have the Remark class, we need to actually use it inside ReadOnlyPerson.
Main:
-
Add three methods
setRemark(Remark),getRemark()andremarkProperty(). Be sure to implement these newly created methods inPerson, which implements theReadOnlyPersoninterface. -
You may assume that the user will not be able to use the
addandeditcommands to modify the remarks field (i.e. the person will be created without a remark). -
Modify
SampleDataUtilto add remarks for the sample data (delete youraddressBook.xmlso that the application will load the sample data when you launch it.)
[Step 6] Storage: Add Remark field to XmlAdaptedPerson class
We now have Remark s for Person s, but they will be gone when we exit the application. Let’s modify XmlAdaptedPerson to include a Remark field so that it will be saved.
Main:
-
Add a new Xml field for
Remark. -
Be sure to modify the logic of the constructor and
toModelType(), which handles the conversion to/fromReadOnlyPerson.
Tests:
-
Fix
validAddressBook.xmlsuch that the XML tests will not fail due to a missing<remark>element.
[Step 7] Ui: Connect Remark field to PersonCard
Our remark label in PersonCard is still a placeholder. Let’s bring it to life by binding it with the actual remark field.
Main:
-
Modify
PersonCard#bindListeners()to add the binding forremark.
Tests:
-
Modify
GuiTestAssert#assertCardDisplaysPerson(…)so that it will compare the remark label. -
In
PersonCardTest, callpersonWithTags.setRemark(ALICE.getRemark())to test that changes in thePerson's remark correctly updates the correspondingPersonCard.
[Step 8] Logic: Implement RemarkCommand#execute() logic
We now have everything set up… but we still can’t modify the remarks. Let’s finish it up by adding in actual logic for our remark command.
Main:
-
Replace the logic in
RemarkCommand#execute()(that currently just throws anException), with the actual logic to modify the remarks of a person.
Tests:
-
Update
RemarkCommandTestto test that theexecute()logic works.
A.2.3. Full Solution
See this PR for the step-by-step solution.
Appendix B: Target Users
This application is targeted towards University students, aiming to meet their needs throughout their university life, and hopefully beyond. University students meet many people in the university, such as project group members, tutors, lecturers, friends and other connections. Nowadays it is important for students to build connections with other people, as connections may also help students for their future career after graduation. Since the students meet a lot of people, they may not be able to remember all the information about the people they met. Therefore, iContacts aims to help students to store and manage their contacts easily.
-
User Profile
-
University Students
-
Students who are part of many CCA clubs and committees
-
Students taking on the role of Teaching Assistant/Tutor
-
Students who are interning and have colleagues
-
Students who have close friends and family
-
Appendix C: User Stories
Priorities: High (must have) - * * *, Medium (nice to have) - * *, Low (unlikely to have) - *
| Priority | As a … | I want to … | So that I can… |
|---|---|---|---|
|
busy user |
search using accumulative attributes |
narrow down my search in the shortest time possible |
|
careless user that finds it troublesome to follow a particular order of entering contact information |
add contact information without following any particular order |
enter contact information more easily and conveniently |
|
forgetful user that can’t remember all tags |
view a list of existing tags |
recall and reuse the tags associated with a person |
|
organized user |
search for contacts by a given tag |
get the list of contacts with the same tag |
|
sociable user that was given contacts by another person |
import from another source file |
add contacts that were shared with me |
|
sociable student |
export selected contacts |
share my contacts with friends |
|
sociable user |
store the person’s birthday |
keep track of the person’s birthday |
|
user |
sort the list by name alphabetically |
view contacts in an alphabetical order |
|
user with limited details of a contact like name and phone number |
add user with just the name and phone number |
store contact information with limited detail |
|
student with large number of connections |
identify tags by colors and their alphabetical order |
easily identify different tags and their alphabetical order in the GUI |
|
user visiting a friend |
view a person’s address location in Google Maps in the GUI |
find directions to his/her place |
|
user |
search for contacts with just the first few characters of their name |
find contacts if I’m unable to remember the spelling of the name |
|
forgetful user |
add nicknames for people |
easily search for them |
|
new user |
see usage instructions |
refer to instructions when I forget how to use the App |
|
user |
add a new person |
to populate data in the address book |
|
user |
delete a person |
remove entries that I no longer need |
|
user |
find a person by name |
locate details of persons without having to go through the entire list |
|
forgetful user |
be able to make changes to existing information when I edit a person’s contact information instead of retyping it |
refer to what was previously entered under a person’s contact information and make changes more easily |
|
user |
hide private contact details by default |
minimize chance of someone else seeing them by accident |
|
user |
find my frequently used contacts at the top of the displayed list when I do a search |
quickly find the contact information I need |
|
regular user |
see frequently used contacts instantly |
locate them more easily |
|
user |
be able to add Display Picture for my contacts |
easily identify them |
|
student who doesn’t use his laptop everywhere |
view my address book online |
view it without the device running the software |
|
member of a team |
send email to a group of persons with one command |
easily send email to a group of persons |
|
user |
include more details for a person’s contact information |
store more information about a person to identify him/her more easily |
|
user |
delete multiple persons in one command |
remove several persons that I no longer need quickly |
|
young student who likes user-friendly applications |
have color-coded commands and contact information in command line |
identify the command and contact information easily |
|
lazy user |
auto-completion of commands |
use the address book more conveniently |
|
trendy user |
choose my own theme for the address book |
customise the address book to my own liking |
|
user |
view my recent additions |
identify which person is newly added |
|
frequent user |
change the font of the address book |
protect my eyes |
|
expert user |
define my own short-hand aliases for commands |
personalise the address book to suit my needs |
|
lazy user |
have short-hand form for each command |
perform commands quickly |
|
busy student |
set reminders |
remind myself of any activities or events that will happen |
|
careless student |
save the address book as an external file |
backup or transfer the address book easily |
|
user |
add multiple emails and phone numbers to a person |
handle persons with more than one email and phone numbers |
|
student with many friends |
get reminder of any approaching birthday |
prepare for the person’s birthday |
|
user |
sort persons by birthday |
identify the persons who will have a birthday soon |
|
careless user |
search a person using similar keywords |
find contacts if I do not know the correct spelling |
|
student with many connections |
add same tag(s) to multiple persons in one command |
tag multiple persons quickly |
|
organized student |
auto sort the list whenever I add a person |
avoid using the sort command with every single additions |
|
busy student with many commitments |
be able to create meeting reminders with my contacts |
prevent myself from forgetting whom should I be meeting at what time |
|
user |
have a secured address book |
have access to my address book |
Appendix D: Use Cases
(For all use cases below, the System is iContacts and the Actor is the user, unless specified otherwise)
Use case: UC1 - Delete person
MSS
-
User requests to list persons
-
iContacts shows a list of persons
-
User requests to delete a specific person in the list
-
iContacts deletes the person
Use case ends.
Extensions
-
2a. The list is empty.
Use case ends.
-
3a. The given index is invalid.
-
3a1. iContacts shows an error message.
Use case resumes at step 2.
-
Use case: UC2 - Export Contacts
MSS
-
User selects contacts to be exported based on current list
-
iContacts takes note of the selected contacts and processes them
-
User requests for creating file containing selected contacts
-
iContacts creates file with the contact information of specified contacts
-
User specifies the location where data file needs to be stored
-
iContacts saves the data file in proper format and indicates success
-
User sends the data file to the required recipient
Use case ends.
Extensions
-
1a. No contacts selected
Use case ends.
-
3a. iContacts unable to create file with mentioned contacts
-
3a1. iContacts shows an error message.
Use case resumes at step 1.
-
-
5a. iContacts unable to store at given location
-
5a1. iContacts shows an error message.
Use case ends
-
-
*a. At any time user chooses to cancel exporting contacts
-
*a1. iContacts shows an error message.
Use case ends.
-
Use case: UC3 - Import Contacts
Precondition
-
User receives the data file containing contacts
MSS
-
User requests to import contacts
-
iContacts requests for file location
-
User specifies location where the data file is found
-
iContacts reads the file and merges the contacts from the received data file into the data file that iContacts is currently using
Use case ends.
Extensions
-
3a. No file selected
Use case ends.
-
4a. iContacts finds duplicate contacts
-
4a1. iContacts shows an error message and doesn’t merge the contacts which are duplicate
Use case resumes at step 1.
-
-
4b. iContacts unable to locate the path of file and open it
-
4b1. iContacts shows an error message.
Use case ends
-
-
*a. At any time user chooses to cancel importing contacts
-
*a1. iContacts shows an error message.
Use case ends.
-
Use case: UC4 - Sharing Contacts
Guarantees
-
The sharing is completed with recipient successfully being able to get the shared contacts
MSS
-
Sending User Exports Contacts (UC2)
-
Receiving User Imports Contacts (UC3)
-
Receiving User views the list of new contacts
Use case ends.
Use case: UC5 - List contacts after applying filtered search
MSS
-
User specifies the keywords for different attributes and requests the list
-
iContacts finds list of all people satisfying all attributes and displays them in a list
Use case ends.
Extensions
-
2a. The list is empty
Use case ends.
Use case: UC6 - Get directions to a contact’s address
MSS
-
User requests for the list of contacts
-
iContacts displays list of all such contacts
-
User requests for directions to a contact’s address
-
iContacts shows directions from current location to contact’s address in Google Maps using GUI
Use case ends.
Extensions
-
2a. The list is empty
Use case ends.
-
3a. The given index is invalid.
-
3a1. iContacts shows an error message.
Use case resumes at step 2.
-
-
4a. Google Maps unable to find location of direction to address
-
4a1. iContacts shows an error message through GUI
Use case ends.
-
Appendix E: Non Functional Requirements
-
Should work on any mainstream OS as long as it has Java
1.8.0_60or higher installed. -
Should be able to hold up to 1000 persons without a noticeable sluggishness in performance for typical usage.
-
A user with above average typing speed for regular English text (i.e. not code, not system admin commands) should be able to accomplish most of the tasks faster using commands than using the mouse.
-
A new user to a CLI environment and/or address book application should be able to learn how to start and use the application within 20 minutes with the help of the User Guide.
-
Should be responsive and commands are executed within 2 seconds under normal load (1000 persons or less)
-
Essential services (adding, deleting contacts etc) should still work perfectly without Internet access.
-
The GUI should follow the The Java Look and Feel guidelines.
-
Should not consume more than 10% of the modern computers/laptop’s CPU’s processing time/power.
-
Should take up as little memory on the hard disk/permanent memory as possible, less than 100 MB.
-
Should be free to download and use.
-
Should work on 32-bit and 64-bit environments.
-
Should not display content not associated with the operations of the address book.
-
User Guide and Developer Guide should be well-documented.
-
Should be backwards compatible with storage files from prior versions.
-
Should be compatible with storage files from the same application but from different computers.
-
Should minimize dependencies on third-party software.
-
Project should not costs more than S$10,000.
Appendix F: Glossary
Mainstream OS
Windows, Linux, Unix, OS-X
Private contact detail
A contact detail that is not meant to be shared with others
Contact information of a person
Contact information of a person, including his/her name, phone, email, address and (optional) tags related to that person.
Attributes
Name and tags of a person
Frequently Used Contacts
The contact information of persons that are frequently viewed or selected.
Tag
A label attached to a person's contact information for the purpose of identification, grouping, and to give more information about that person.
Command Line Interface
A user interface to an application in which the users responds to a prompt by typing in a command on a specified line
Graphical User Interface
A user interface to an application in which the users interact with the application through graphical icons and visual indicators
The Java Look and Feel
It specifies the Java user interface components across a broad spectrum of Java based frameworks.
Data File
The XML file that stores the contact information of address book. This is also the file that iContacts reads from when starting up. There can be multiple data files at any one time.
Contacts
The people whose details are present in my address book.
Display Picture
A photo of the person represented by this contact entry
Google Maps
A web mapping service procided by Google that offers satellite imagery, street maps, route planning, real-time traffic conditions and other features.
Gradle
An open-source build automation system that also serve as a dependency management tool.
JavaFX
A software platform that contains a set of graphics and packages that enables developers to develop rich applications that can run across a wide variety of devices and platforms.
Travis
A hosted, distributed continuous integration service used to build and test software projects hosted at GitHub on a Linux virtual machine.
AppVeyor
A hosted, distributed integration service used to build and test software projects hosted at GitHub on a Microsoft Windows virtual machine.
Status
A description of the current state of the event, whether it has already passed, is happening now, is happening within three days or not happening anytime soon.